Tag: PREMIUM

  • M-VI-Y (120) Tank Preview – World of Tanks Supertest

    M-VI-Y (120) Tank Preview – World of Tanks Supertest

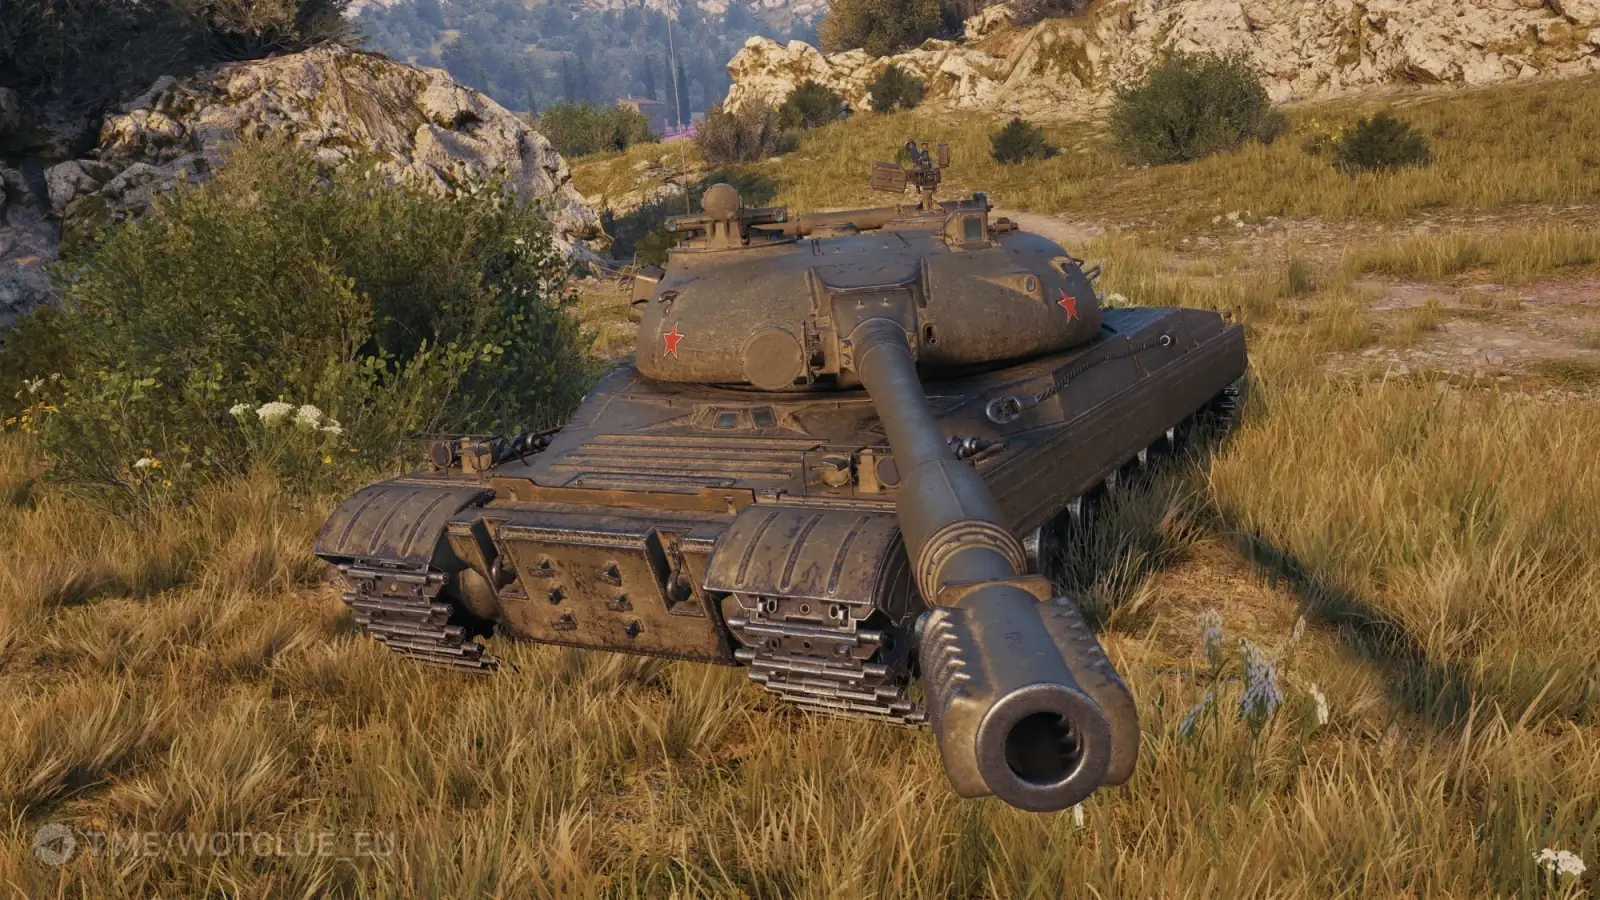
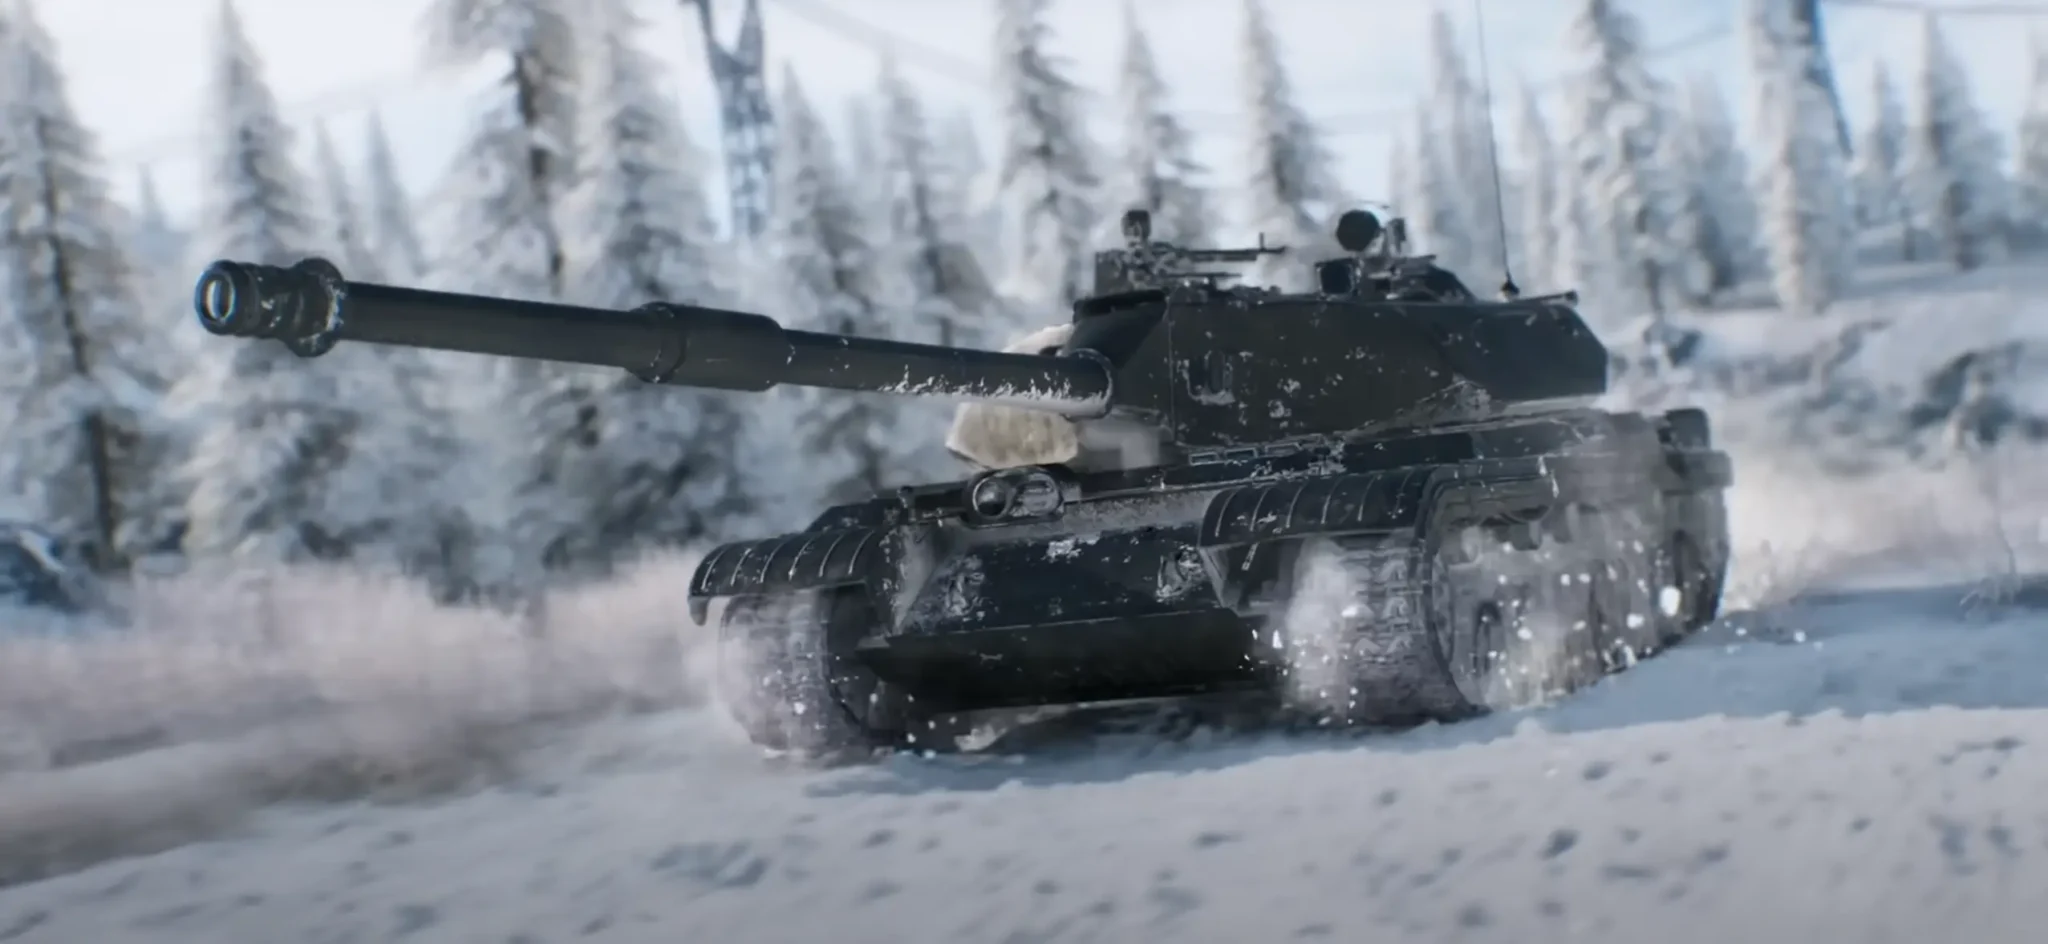
    This vehicle represents an alternative configuration of the tech tree M-VI-Y, trading some characteristics for different strengths while maintaining the core Yoh philosophy of survivability through innovative track redundancy. For players who have enjoyed the Yoh line but want a premium credit-earning version, or for those curious about trying the unique reserve track mechanic without grinding the full line, the M-VI-Y (120) offers an intriguing package.

    m-vi-y-120 tank

    Historical Background: The H.L. Yoh Company’s Vision

    The M-VI-Y (120) represents one of the projects proposed by the H.L. Yoh Company as part of their ambitious program for developing advanced tanks featuring an emergency track system. The Yoh Company was known for their unconventional and often visionary approaches to tank design in the 1950s, proposing numerous innovations that were ahead of their time.

    Distinctive Design Feature: Unlike other vehicles designed by the company, this particular project was distinguished by a powerful muzzle brake on its large-caliber gun. This prominent muzzle brake would have helped manage the recoil of the substantial 120mm gun, a practical consideration for maintaining accuracy and crew comfort during sustained fire.

    Never Built: Like most of the H.L. Yoh Company’s ambitious designs, this project never progressed beyond the drawing board. The concept was never built in metal, remaining purely theoretical. However, the innovative reserve track system that defined Yoh’s proposals has found new life in World of Tanks, allowing players to experience what might have been.

    The Yoh Company’s legacy lies not in tanks they built, but in ideas they pioneered—concepts that were too radical or expensive for 1950s America but have influenced tank design thinking for decades.

    The Reserve Track Mechanic: Yoh’s Signature Feature

    The defining characteristic of all Yoh vehicles, including the M-VI-Y (120), is the innovative reserve track mechanic:

    Emergency Mobility System: Starting from Tier VII, all vehicles in the Yoh branch feature an additional track attached to the main tracks. This redundant system allows these vehicles to continue moving (albeit at reduced speed) even if both main tracks are destroyed.

    Survivability Advantage: This mechanic provides a crucial survivability benefit that other heavy tanks simply don’t have. When opponents attempt to immobilize you through track damage—a common tactic against heavy tanks—the M-VI-Y (120) can continue maneuvering, creating tactical opportunities that would be impossible in other vehicles.

    Tactical Flexibility: The reserve track system enables different tactics and maneuvers on the battlefield. You can push more aggressively knowing that track damage won’t completely immobilize you, and you can execute tactical retreats even under focused fire aimed at your tracks.

    This mechanic fundamentally changes how the tank interacts with the battlefield, providing a unique safety net that rewards aggressive positioning.

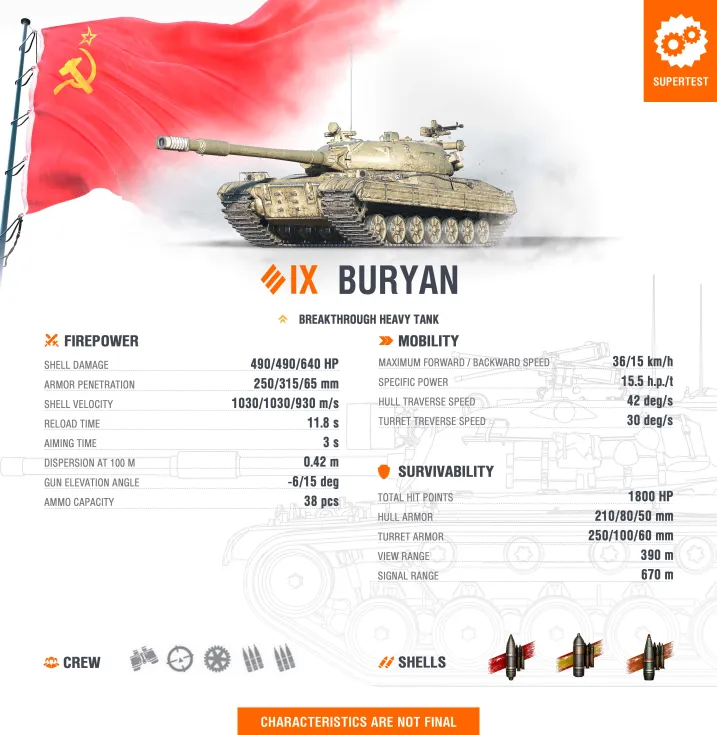
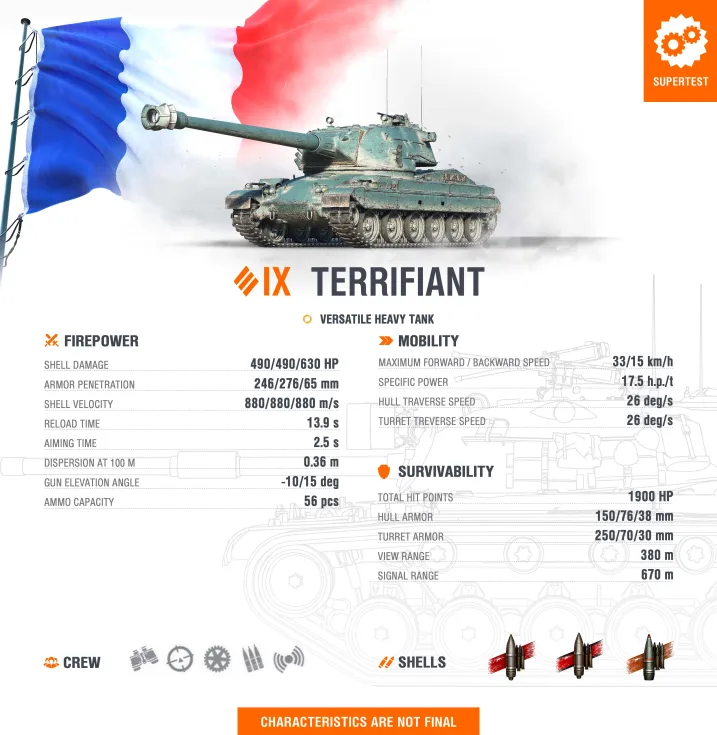
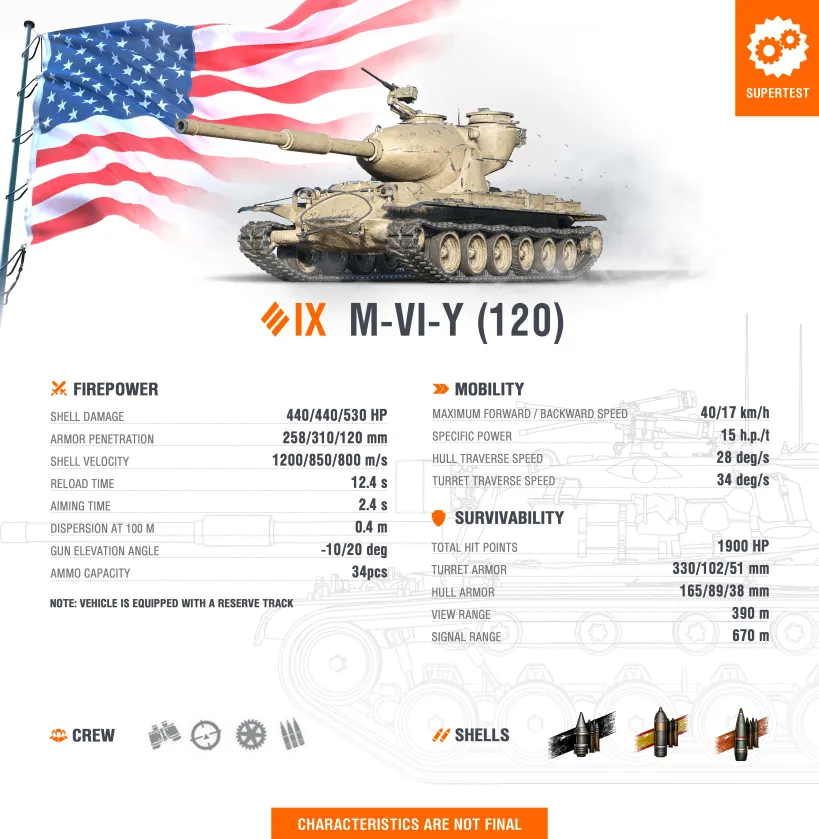
    Firepower: The 120mm Configuration

    The M-VI-Y (120) is equipped with a substantial 120mm gun that delivers solid performance:

    Alpha Damage: The gun boasts 440 HP of damage per shot, providing meaningful trading power in heavy tank confrontations. This alpha damage allows the M-VI-Y (120) to punish exposed enemies and win HP trades decisively.

    Penetration Values: Standard AP rounds feature 252mm of penetration, while special HEAT shells offer 300mm. These values are competitive for Tier IX, handling most same-tier opponents effectively, though heavily armored targets may occasionally require premium rounds or careful weak spot targeting.

    Accuracy: With 0.40 dispersion, the gun’s accuracy is adequate but not exceptional. This is typical for high-alpha heavy tank guns and shouldn’t be expected to perform sniper duties, though it’s sufficient for typical heavy tank engagement ranges.

    Aim Time: The gun features a reasonable aim time that allows for relatively quick shot preparation, though commanders should still take care to fully aim for maximum accuracy, especially at longer ranges.

    The 120mm configuration emphasizes per-shot impact over sustained DPM, creating a playstyle focused on decisive shots rather than constant fire.

    Comparison to Tech Tree M-VI-Y

    The M-VI-Y (120) differs from its tech tree counterpart in several key ways:

    Gun Choice: While the tech tree M-VI-Y typically runs the faster-firing 105mm gun for better DPM and accuracy, the M-VI-Y (120) is locked to the 120mm configuration, trading fire rate for per-shot damage.

    Alpha vs DPM Trade-off: You gain 40 HP more damage per shot compared to the 105mm (440 vs 400), but sacrifice approximately 0.05 accuracy (0.35 vs 0.40). This trade-off favors players who prefer decisive alpha strikes over sustained pressure.

    Mobility Difference: The M-VI-Y (120) has almost 2 hp/t less specific power than the tech tree version, making it slightly less nimble. This mobility reduction is noticeable but not crippling, requiring slightly more careful positioning decisions.

    Premium Benefits: As a premium vehicle, the M-VI-Y (120) offers enhanced credit earning and crew training benefits that the tech tree version cannot match, making it valuable for economic reasons beyond pure performance.

    The choice between the two versions ultimately comes down to playstyle preference and whether you value the premium economic benefits.

    Gun Depression and Elevation: American Excellence

    One of the M-VI-Y (120)’s greatest strengths is its exceptional gun handling angles:

    Outstanding Gun Depression: With –10 degrees of gun depression, the M-VI-Y (120) can utilize terrain features better than most heavy tanks. This exceptional depression enables effective hull-down gameplay on ridges and hills that other heavies cannot access.

    Impressive Elevation: The +20 degrees of gun elevation provides flexibility for engaging targets on elevated positions or over obstacles. While less commonly used than depression, this elevation capability occasionally proves invaluable.

    Classic American Advantage: This gun depression/elevation combination represents classic American heavy tank design philosophy, echoing legendary vehicles like the T29 and T32 that dominated hull-down positions through superior gun angles.

    The gun handling angles are arguably the M-VI-Y (120)’s most significant tactical advantage, enabling positioning options that most heavy tanks cannot exploit.

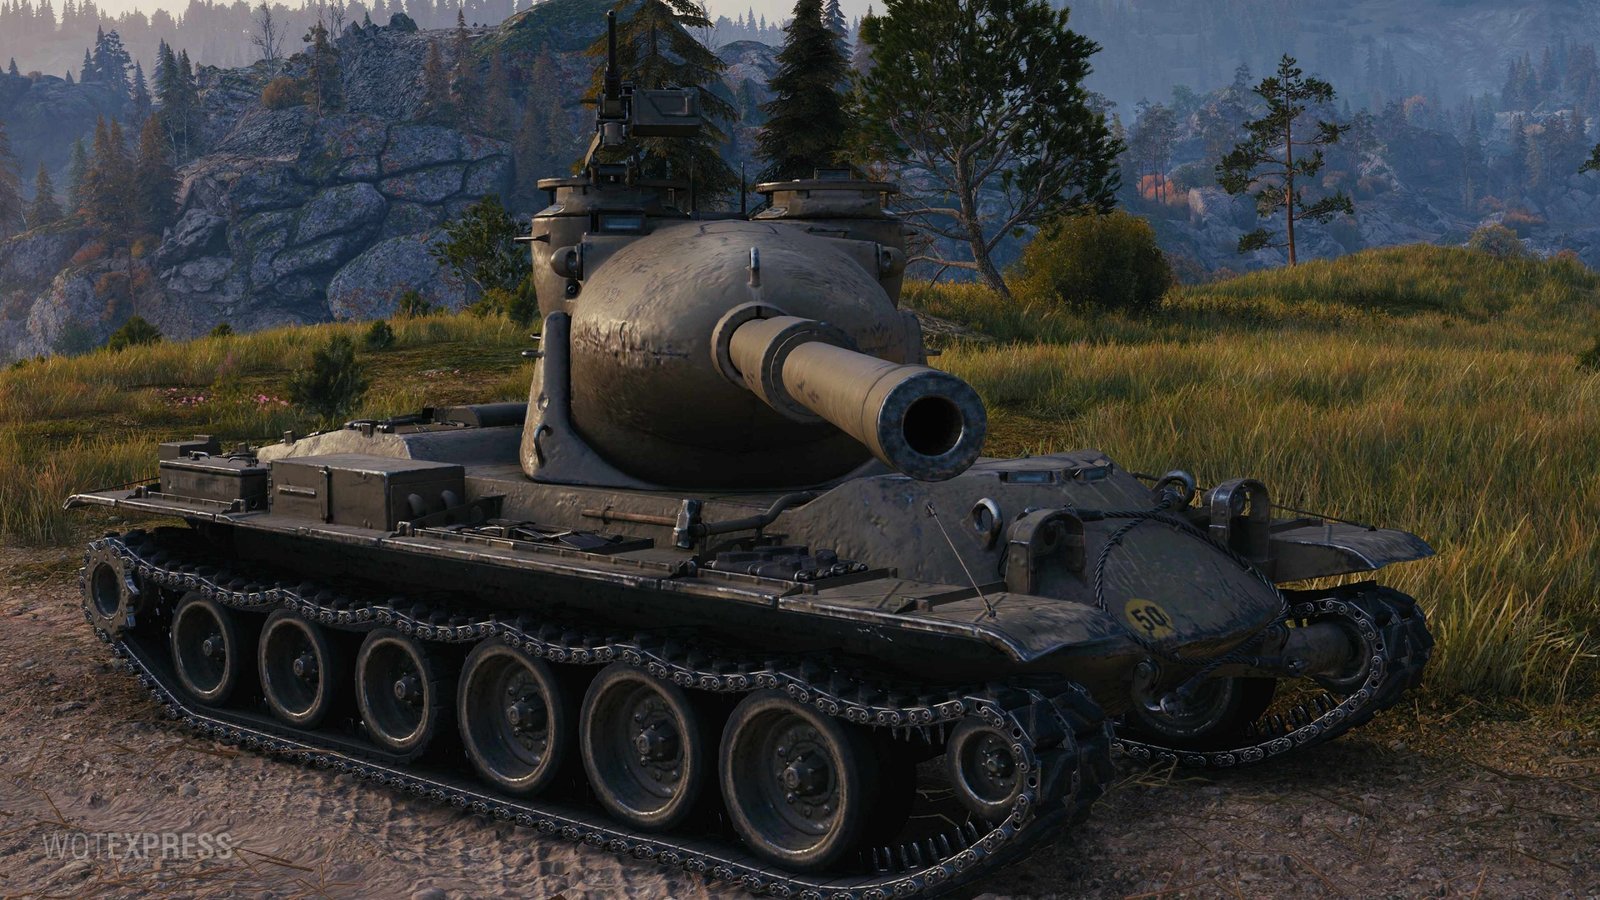
    Armor Profile: Formidable Turret Protection

    The M-VI-Y (120) features armor characteristics typical of the Yoh line:

    Formidable Turret Armor: The turret is the M-VI-Y (120)’s primary defensive asset, featuring robust protection that can bounce shots from same-tier opponents when properly positioned. This strong turret makes hull-down gameplay particularly effective.

    Hull Armor Considerations: Like most Yoh tanks, the hull armor is respectable but not impenetrable. Commanders should avoid exposing the hull unnecessarily and prioritize hull-down positions where the strong turret provides primary protection.

    Hit Points: The tank features a healthy HP pool appropriate for a Tier IX heavy, allowing it to absorb some punishment and stay in fights longer than more fragile vehicles.

    The armor profile strongly encourages hull-down gameplay, where the combination of gun depression and turret armor creates nearly impenetrable positions on favorable terrain.

    Mobility Characteristics

    The M-VI-Y (120) offers decent mobility for a heavily armored Tier IX heavy:

    Adequate Speed: The mobility allows for reasonable repositioning and map presence, though this isn’t a tank for rapid flanking maneuvers or race-to-position gameplay.

    Specific Power: While slightly lower than the tech tree M-VI-Y, the specific power is sufficient for maintaining relevance as battle lines shift and positions need adjustment.

    Reserve Track Benefit: Even when tracks are destroyed, the reserve track system maintains some mobility, preventing the complete immobilization that would cripple other heavy tanks.

    The mobility package ensures the M-VI-Y (120) can contribute throughout battles without feeling stuck in initial deployment positions.

    Tactical Considerations

    The M-VI-Y (120)’s characteristics create clear tactical guidelines:

    Hull-Down Priority: The combination of –10 degrees depression and formidable turret armor makes hull-down positions the ideal fighting location. Seek ridges, hills, and terrain features where you can maximize these advantages.

    Key Position Control: The M-VI-Y (120) excels at locking down critical map positions. The combination of alpha damage, armor, and reserve tracks makes it difficult for opponents to dislodge you from important areas.

    Aggressive Positioning with Safety Net: The reserve track mechanic encourages more aggressive positioning than typical heavy tanks. You can push forward knowing that track damage won’t completely immobilize you, creating psychological pressure on opponents.

    Trading Optimization: The 440 alpha damage rewards careful trading. Wait for opponents to expose themselves, deliver your shot, and retreat to cover while reloading. The strong turret armor enables favorable trades in hull-down positions.

    Playstyle Implications

    The M-VI-Y (120) rewards commanders who understand terrain and positioning:

    Terrain Reading: Success requires understanding which map positions offer ideal hull-down opportunities. Learn where the –10 degrees depression creates unfair advantages over opponents with limited gun handling.

    Patient Aggression: Push forward deliberately to take strong positions, but don’t overextend beyond support range. The reserve tracks help if things go wrong, but prevention beats recovery.

    Alpha Damage Maximization: With 440 HP per shot, every shell matters. Take the extra second to ensure hits rather than rushing shots and missing opportunities.

    Economic Focus: As a premium vehicle, the M-VI-Y (120) should be used for credit generation. Maximize survival time and damage output to ensure profitable battles.

    Commanders looking to master the M-VI-Y (120) should consider:

    • Prioritizing hull-down positions on ridges and hills
    • Using the exceptional gun depression to engage from unexpected angles
    • Leveraging the reserve tracks for aggressive position-taking
    • Focusing on HP trading rather than sustained firefights
    • Supporting teammates by holding key terrain that controls map flow
    • Taking care with ammunition selection given the slower fire rate
    • Using the strong turret armor to bait shots while minimizing hull exposure

    Community Reception

    Initial community reactions to the M-VI-Y (120) have been mixed:

    Questionable Value: Many players question whether this premium is necessary, noting that the tech tree M-VI-Y already offers a 120mm gun option alongside the preferred 105mm.

    Modest Improvements: The community observes that you only gain 40 HP more damage per shot in exchange for 0.05 worse accuracy (0.35 vs 0.40) and reduced mobility, making the trade-off questionable for many players.

    Premium Redundancy: Some players see this as yet another premium tank being created for Tier IX without a compelling gameplay reason, suggesting it’s primarily a monetization effort.

    Potential Reward Tank: Speculation exists that the M-VI-Y (120) might be destined as an annual Tier IX reward tank rather than a direct sale premium.

    Yoh Continuation: Others appreciate seeing the Yoh line expanded, viewing it as “Yoh The Tank: Chapter 3” following previous premium Yoh-inspired vehicles.

    What Sets the M-VI-Y (120) Apart

    The M-VI-Y (120) occupies a specific niche:

    Premium Yoh Experience: For players who want to experience the reserve track mechanic while earning credits and training crew, this provides that opportunity without grinding the tech tree.

    120mm Focus: Unlike the tech tree version where players typically prefer the 105mm, this vehicle commits fully to the 120mm alpha damage playstyle.

    Classic American Heavy: The gameplay represents traditional American heavy tank strengths—excellent gun depression, strong turret armor, and hull-down dominance.

    Economic Tool: As a premium, the primary value lies in credit earning and crew training rather than unique gameplay mechanics.

    What’s Next?

    The M-VI-Y (120) has progressed from Supertest to developer and supertester testing in Random Battles, suggesting it’s moving toward eventual release.

    Key questions remain:

    • Will this be sold directly or offered as a reward tank?
    • Can the 120mm configuration compete with the tech tree M-VI-Y’s preferred 105mm setup?
    • Is there sufficient demand for another Yoh premium given the existing lineup?
    • Will balance adjustments occur before final release?

    Final Thoughts

    The M-VI-Y (120) represents a straightforward premium variant of an existing tech tree vehicle, offering the Yoh experience with premium economic benefits. While it doesn’t revolutionize gameplay or bring dramatically new capabilities, it provides a solid platform for credit earning while maintaining the reserve track mechanic that makes Yoh tanks unique.

    For commanders who enjoy the Yoh playstyle and want a premium credit earner with excellent gun depression and hull-down capability, the M-VI-Y (120) delivers exactly that. The 440 alpha damage combined with –10 degrees depression and formidable turret armor creates a vehicle that excels at locking down key positions and dominating ridge fights.

    Whether the M-VI-Y (120) represents good value depends largely on your circumstances: Do you already have the tech tree M-VI-Y? Do you need another Tier IX premium? Do you value the 120mm alpha over the 105mm DPM? These questions will determine whether this premium Yoh variant deserves a place in your garage.

  • Kame Tank Preview – World of Tanks Supertest

    Kame Tank Preview – World of Tanks Supertest

    The World of Tanks Supertest has welcomed an intriguing new addition to the Japanese tech tree: the Kame, a Tier IX premium medium tank that brings a revolutionary combination of mechanics to the battlefield.

    kame tank statistics

    A Revolutionary Firepower System

    The Kame’s defining characteristic is its unprecedented combination of two distinct mechanics working in tandem: a five-shell autoloader paired with an active gun cooling system. This marks the first time a Japanese medium tank has featured the gun cooling mechanic, and the first time it’s been combined with an autoloader.

    The 105mm Gun: The heart of the Kame is its 105mm cannon, delivering 330 HP of damage per shot. While this alpha damage sits comfortably in the middle range for Tier IX mediums, it’s the delivery system that makes it special.

    Five-Shell Autoloader: With just 1.5 seconds between shots, the Kame can unload its entire clip in a devastating 6-second burst, dealing 1,650 HP of potential damage. This clip potential puts it among the most dangerous burst-damage mediums at its tier.

    Gun Cooling System: Here’s where things get interesting. The Kame has notably poor base accuracy, but after cooling the gun for just a few seconds using the double aiming mechanic (which takes 3.5 seconds to fully aim), the dispersion returns to normal, competitive levels.

    This creates a fascinating tactical choice: commanders can either quickly discharge the clip in close combat for maximum burst damage, or take their time to fully aim for precise, sniper-style gameplay. The same tank can function as a brawler or a support sniper depending on the situation.

    The Historical “Turtle”

    The Kame has an interesting historical background. It was a project for a Japanese medium tank developed in 1945 to counteract Allied and Soviet medium and heavy tanks. The designers sought to apply the most successful technical innovations from various tank-building schools, incorporating elements like torsion-bar suspension, well-sloped hull armor, and a powerful gun.

    Engineers had the specific task of increasing the rate of fire, leading them to mount the gun with a special external radiator designed to significantly reduce barrel heating. This historical detail directly inspired the gun cooling mechanic in World of Tanks. Due to the tank’s peculiar turtle-shell-like appearance created by these external cooling elements, it earned the name “Kame.”

    The vehicle never progressed beyond the design phase, as Japan surrendered before a prototype could be built. However, Kame previously appeared in the console version of World of Tanks without any special mechanics, despite the tank model featuring those distinctive external barrel-cooling elements. Now, the PC version finally brings those cooling elements to life as a functional game mechanic.

    Defensive Capabilities and Armor Profile

    Despite being classified as a support medium tank, the Kame is surprisingly bulky and well-protected for its class:

    Turret Armor: The front of the turret boasts 200mm of armor, providing decent protection against most same-tier opponents when properly angled. This solid turret armor enables the Kame to trade shots more confidently than typical mediums.

    Hull Protection: Like many Japanese vehicles, the Kame features respectable hull armor with good sloping, though commanders should avoid relying on it against high-penetration guns.

    Bulky Profile: The Kame is notably larger than typical medium tanks, which presents both advantages and disadvantages. The bulk provides more places for armor to work, but also makes the tank easier to spot and hit.

    Mobility Characteristics

    Good news for commanders concerned about the Kame’s bulk: this turtle can move.

    Top Speed: With a maximum forward speed of 55 km/h, the Kame keeps pace with the medium tank standard, allowing it to respond to battlefield developments and relocate between positions effectively.

    Maneuverability: The combination of decent speed and Japanese medium tank handling characteristics means the Kame won’t feel sluggish despite its size, enabling both aggressive positioning and tactical retreats.

    Tactical Considerations

    The Kame presents commanders with unprecedented tactical flexibility through its dual-mode firepower system:

    Burst Damage Specialist: In close-quarters engagements or when targets present themselves unexpectedly, commanders can immediately dump the clip for massive burst damage. The 1.5-second intra-clip reload makes this devastatingly effective in knife-fighting situations.

    Precision Sniper: When time permits and longer-range engagements are necessary, commanders can use the double aiming mechanic to transform the Kame into a capable support sniper, delivering accurate fire from second-line positions.

    Support Medium Role: The combination of good turret armor, respectable mobility, and flexible firepower makes the Kame an excellent support vehicle. It can follow up on aggressive pushes with clip damage or provide covering fire from range.

    Opportunistic Playstyle: The Kame rewards commanders who can read the battlefield and choose the appropriate mode for each engagement. Knowing when to burst and when to aim carefully will separate good Kame players from great ones.

    Playstyle Implications

    The Kame demands a thoughtful, adaptable approach from its commanders:

    Two-Mode Mindset: Successfully playing the Kame requires constantly evaluating whether situations call for burst damage or aimed fire. Close-range brawls favor quick clips; longer-range support demands full aiming.

    Positioning Flexibility: The good mobility and turret armor allow commanders to take calculated risks, pushing forward when opportunities arise or falling back to support positions when needed.

    Ammunition Management: With only five shells per clip, every shot matters. Commanders must balance aggression with conservation, ensuring they don’t empty the clip prematurely and leave themselves vulnerable during the lengthy reload.

    Terrain Utilization: The solid turret armor and reasonable gun depression enable hull-down play when fully aimed, while the burst potential rewards aggressive positions when situations demand it.

    Commanders looking to master the Kame should consider:

    • Learning to quickly assess whether situations call for burst or aimed fire
    • Utilizing the strong turret armor in hull-down positions when sniping
    • Saving the clip for crucial moments rather than wasting it on low-value targets
    • Practicing the timing of the gun cooling system to maximize accuracy
    • Using the good mobility to choose engagements rather than being forced into unfavorable fights

    Community Reception and Concerns

    Initial community reactions to the Kame have been mixed, with significant discussion around how the gun cooling mechanic will interact with the autoloader system.

    The Accuracy Debate: The poor base accuracy (0.6 dispersion) has raised concerns among players. Community members point out that 1.5-second intra-clip reload becomes largely pointless if shots after the first suffer from terrible dispersion. The question remains: does the gun cooling system stay active between shells in the clip, or does it reset with each shot?

    Mechanic Interaction Questions: How exactly will the double aiming mechanic work with a clip-based weapon? If accuracy resets between shells, the burst mode becomes unreliable even at close range. If it maintains accuracy throughout the clip after the initial aim, the tank could be extremely powerful.

    Balance Concerns: Some players worry that the combination of mechanics might prove either too powerful if executed well or too frustrating if the interaction feels clunky. The 3.5-second aim time could leave commanders vulnerable, but the reward of accurate clip damage might justify the risk.

    What Sets the Kame Apart

    The Kame represents a significant departure from traditional medium tank design philosophy:

    First Dual-Mechanic Tank: No other vehicle combines autoloader mechanics with gun cooling, making the Kame a genuine innovation in tank design.

    Tactical Flexibility: Unlike specialized tanks that excel in narrow circumstances, the Kame can adapt its playstyle mid-battle, switching between roles as needed.

    Risk-Reward Balance: The poor base accuracy and lengthy aim time create meaningful choices and counterplay opportunities, preventing the tank from being overwhelming while rewarding skilled play.

    Japanese Innovation: The Kame continues the Japanese tech tree’s tradition of unique mechanics and interesting design choices, adding another distinctive vehicle to the nation’s roster.

    What’s Next?

    As a Supertest vehicle, the Kame’s final statistics and mechanical interactions remain subject to change. Wargaming will need to carefully balance how the gun cooling system interacts with the autoloader to ensure the vehicle is both effective and fair.

    Key questions for the testing phase include:

    • Does gun cooling remain active throughout the clip or reset between shells?
    • Is the 3.5-second aim time too punishing for the tactical flexibility it provides?
    • Can the poor base accuracy be balanced against the cooling benefits?
    • Will the bulky profile offset the armor and firepower advantages?
    • Is 330 alpha per shell sufficient given the mechanical complexity?

    The testing phase will be crucial in determining whether the Kame becomes a beloved favorite for its unique playstyle or requires significant adjustments to function as intended.

    Final Thoughts

    The Kame represents exactly the kind of innovative thinking that keeps World of Tanks fresh and interesting after years of development. By combining two distinct mechanics and creating genuine tactical choices around when and how to deploy firepower, Wargaming has crafted a vehicle that promises to be both challenging and rewarding to master.

    Whether you’re excited about the tactical flexibility, intrigued by the historical background, or simply curious about how these mechanics will interact, the Kame offers something genuinely new to the medium tank experience. For commanders who appreciate adaptive gameplay and enjoy vehicles that reward thoughtful decision-making, this turtle-inspired tank could become a premium favorite.

    The combination of burst potential and sniper capability, wrapped in a surprisingly durable package with good mobility, creates a medium tank unlike any other currently in the game. If Wargaming can successfully balance the mechanical interactions and ensure the gun cooling system works intuitively with the autoloader, the Kame could set a new standard for innovative premium vehicle design.

  • Renmin Tanke Tank Preview – World of Tanks Supertest

    Renmin Tanke Tank Preview – World of Tanks Supertest

    The World of Tanks Supertest has just welcomed an intriguing addition to the Chinese tech tree: the Renmin Tanke, a Tier IX assault medium tank that introduces a completely unique firing mechanic to the game.

    renmin tanke statistics

    A Revolutionary Double-Shot System

    The Renmin Tanke’s most distinctive feature is its unprecedented two-round autoloader system with a twist that sets it apart from every other autoloader currently in the game. While many tanks feature multi-shell clips, the Renmin Tanke stores both shells in a single container, creating a fundamentally different firing experience.

    The Firing Mechanic: When you pull the trigger on the Renmin Tanke, you’re committed to firing both shells. The tank releases both rounds with a brief 0.75-second delay between them, creating a forced double-tap every single time. After both shells are discharged, the autoloader enters a 6.8-second reload cycle to prepare the next pair.

    Damage Output: Each shell deals 200 HP of damage, meaning every trigger pull delivers 400 HP in rapid succession. This creates an effective alpha damage of 400 HP delivered over approximately 0.75 seconds, followed by the reload period.

    DPM Advantages: The combination of 400 HP per firing cycle and a relatively short 6.8-second reload results in strong damage per minute for a Tier IX medium tank. This consistent damage output makes the Renmin Tanke a threatening presence in sustained engagements.

    This firing system differs fundamentally from traditional autoloaders. With conventional autoloaders, commanders can choose to fire one shell and save the rest for later. The Renmin Tanke removes that option entirely—you’re always firing both shells together. This creates unique tactical considerations around ammunition conservation and engagement timing.

    Gun Handling and Accuracy

    Beyond its unique loading system, the Renmin Tanke offers comfortable gun handling characteristics that make it pleasant to play:

    Reliable Accuracy: The gun handling is described as comfortable, suggesting good dispersion values and reasonable aim time. This allows commanders to deliver their double-shot with confidence, knowing both shells are likely to hit their mark.

    Consistent Performance: Unlike some experimental tanks that sacrifice gun handling for unique mechanics, the Renmin Tanke maintains competitive accuracy standards. This reliability is crucial given that every trigger pull commits 400 HP worth of ammunition—you want both shells to count.

    The combination of forced double-shots and comfortable gun handling creates an interesting dynamic. Commanders must be more deliberate with their shooting, but once committed, they can trust the gun to deliver both shells accurately.

    Armor Profile and Survivability

    The Renmin Tanke brings impressive defensive capabilities for its class, positioning it as an “assault” medium tank:

    Excellent Armor for Class: The vehicle features outstanding armor protection compared to typical medium tanks at Tier IX. This allows the Renmin Tanke to take more aggressive positions and trade shots with confidence that other mediums couldn’t match.

    Frontline Presence: The combination of good armor and strong burst damage (400 HP in 0.75 seconds) makes the Renmin Tanke effective in aggressive pushes and frontline engagements. It can absorb incoming fire while delivering punishing counter-attacks.

    Assault Medium Role: Unlike traditional support mediums that rely on mobility and concealment, the Renmin Tanke is built to lead pushes and hold positions. The armor enables this playstyle while the double-shot mechanic punishes opponents who expose themselves.

    This armor profile fundamentally changes how the tank operates compared to typical Chinese mediums, which often rely on gun depression and hull-down positions rather than direct armor protection.

    Mobility Characteristics

    The Renmin Tanke offers decent mobility, though it’s not built for high-speed flanking maneuvers:

    Forward Speed: With a maximum forward speed of 45 km/h, the Renmin Tanke maintains reasonable pace for a heavily armored medium tank. While not exceptional, this speed is sufficient for relocating between positions and keeping up with team movements.

    Reverse Speed: The 20 km/h reverse speed provides adequate retreat capability, allowing commanders to back out of unfavorable situations or retreat behind cover after delivering their double-shot.

    Balanced Mobility: The mobility profile suggests a tank designed for measured, deliberate gameplay rather than aggressive flanking. The Renmin Tanke excels at advancing with the team and holding captured positions, not racing around the map looking for flanking opportunities.

    This mobility package complements the assault medium role perfectly. You don’t need exceptional speed when your armor allows you to advance directly rather than seeking circuitous flanking routes.

    Tactical Considerations

    The Renmin Tanke’s unique mechanics create several important tactical considerations:

    Ammunition Conservation: Every trigger pull expends two shells. Commanders must be more thoughtful about when to fire, as casual shooting will deplete ammunition quickly. Each engagement decision carries more weight when you’re always committing 400 HP worth of shells.

    Burst Damage Trading: The double-shot mechanic excels in peek-a-boom situations. Commanders can expose themselves briefly, deliver 400 HP in less than a second, and retreat before opponents can respond effectively. This makes the Renmin Tanke devastating in hull-down positions or around corners.

    No Shot Conservation: Unlike traditional autoloaders where you might fire one shell and save the rest, the Renmin Tanke removes that strategic layer. You can’t “save” ammunition for emergencies—every shot is an all-or-nothing commitment. This eliminates some complexity but adds pressure to make each shot count.

    Frontline Leadership: The excellent armor for its class means the Renmin Tanke can lead aggressive pushes. The double-shot mechanic allows it to quickly eliminate exposed enemies, creating openings for teammates to exploit.

    Playstyle Implications

    The Renmin Tanke rewards commanders who embrace its assault medium role and unique firing mechanics:

    Measured Aggression: The combination of armor and burst damage encourages bold positioning, but the forced double-shots demand discipline. You can’t waste ammunition on low-health targets when every trigger pull uses two shells.

    Trading Efficiency: The double-shot system maximizes efficiency in trading situations. When both shells connect, you deliver 400 HP faster than most opponents can respond, creating favorable trade ratios.

    Target Selection: With limited control over ammunition expenditure, target selection becomes crucial. Shooting a nearly dead tank wastes one shell, while targeting healthy opponents maximizes the value of each double-shot.

    Cover Utilization: The ability to deliver 400 HP in 0.75 seconds makes cover-based gameplay extremely effective. Peek out, double-tap, retreat—the Renmin Tanke excels at this rhythm.

    Commanders looking to master the Renmin Tanke should consider:

    • Planning shots carefully since every trigger pull commits two shells
    • Using the excellent armor to push aggressively into advantageous positions
    • Maximizing burst damage in peek-a-boom situations around hard cover
    • Avoiding wasteful shots on nearly dead enemies
    • Leveraging the strong DPM in sustained engagements
    • Leading team pushes where the armor and burst damage can create breakthroughs

    Community Reception

    Initial community reactions to the Renmin Tanke have been mixed, with discussion focusing on how the forced double-shot mechanic will feel in practice:

    Mechanic Innovation: Many players appreciate Wargaming’s continued experimentation with unique mechanics, seeing the Renmin Tanke as another interesting addition to the “World of Mechanics” era of tank design.

    Practical Concerns: Some community members wonder about the inability to cancel the second shot. If the first shell kills the target, the second automatically fires—potentially wasting ammunition or giving away your position unnecessarily.

    Blueprint Speculation: Several players suspect the Renmin Tanke might be destined for a Battle Pass or special event rather than traditional premium sales, given its Tier IX designation and unique mechanic.

    Playstyle Questions: The community is curious whether the forced double-shots will feel restrictive or liberating. Does removing the choice of firing single shells simplify gameplay beneficially, or does it remove too much tactical depth?

    What Sets the Renmin Tanke Apart

    The Renmin Tanke represents a bold new direction in autoloader design:

    Unique Container System: No other tank stores multiple shells in a single container that must be fired together. This mechanic is entirely new to World of Tanks.

    Assault Medium Archetype: The combination of excellent armor, burst damage, and moderate mobility creates a distinct playstyle focused on frontline leadership rather than flanking or support roles.

    Simplified Yet Demanding: By removing the choice of firing individual shells, the Renmin Tanke simplifies some aspects of autoloader gameplay while adding pressure to make every trigger pull count.

    Strong Fundamentals: Beyond its unique mechanic, the tank offers solid armor, good gun handling, and strong DPM. It’s not just a gimmick—it’s a well-rounded assault medium that happens to have an innovative firing system.

    What’s Next?

    As a Supertest vehicle, the Renmin Tanke’s final statistics and mechanical implementation remain subject to change. Wargaming will need to carefully evaluate how the forced double-shot system feels in practice and whether it needs adjustments.

    Key questions for the testing phase include:

    • Can commanders cancel the second shot if the first kills the target?
    • Is the 6.8-second reload balanced for the 400 HP burst potential?
    • Does the ammunition capacity support the forced double-shots adequately?
    • Will the excellent armor be sufficient to enable the aggressive playstyle the mechanics suggest?
    • How does the tank perform in various map types and engagement scenarios?

    The Supertest phase will be crucial in determining whether the Renmin Tanke’s unique mechanic feels rewarding to play or becomes frustrating due to wasted ammunition.

    Final Thoughts

    The Renmin Tanke represents exactly the kind of bold innovation that keeps World of Tanks fresh and interesting. By completely reimagining how autoloaders function and removing the traditional shell-by-shell firing control, Wargaming has created a medium tank that demands a different mindset and rewards different skills than conventional autoloaders.

    Whether you’re excited about the streamlined double-shot system or concerned about the loss of firing control, the Renmin Tanke offers something genuinely new to the medium tank experience. For commanders who appreciate aggressive, frontline-focused gameplay and can adapt to the all-or-nothing nature of the double-shot mechanic, this “People’s Tank” could become a favorite assault medium.

    The combination of excellent armor, strong burst damage, comfortable gun handling, and consistent DPM creates a well-rounded package that happens to feature an innovative firing system. If Wargaming successfully balances the forced double-shots and provides adequate ammunition capacity, the Renmin Tanke could set a new standard for assault medium tank design—proving that removing player choice can sometimes create more interesting tactical decisions, not fewer.

  • Buryan Tank Preview – World of Tanks Supertest

    Buryan Tank Preview – World of Tanks Supertest

    The World of Tanks Supertest has welcomed an impressive addition to the French heavy tank lineup: the Terrifiant, a Tier IX premium heavy tank that continues the design philosophy of France’s “alternative” heavy branch.

    buryan statistics

    A Rare Firepower Combination

    The Buryan’s defining characteristic is its exceptional firepower package that combines two attributes rarely seen together in Soviet heavy tanks at Tier IX:

    Impressive Alpha Damage: The Buryan wields a gun capable of delivering 490 HP of damage per shot. This alpha damage is notably higher than most Tier IX heavy tanks, placing it in an elite category of vehicles that can trade shots with devastating efficiency.

    High Damage Per Minute: What makes the Buryan truly special isn’t just the impressive single-shot damage—it’s the combination of that alpha with high DPM. Most tanks that hit for 490 HP sacrifice rate of fire, but the Buryan maintains strong sustained damage output alongside its powerful punch.

    Exceptional in Duels: This rare combination of high alpha and high DPM makes the Buryan exceptionally strong in one-on-one confrontations. In a duel scenario, the tank can deliver crushing blows while maintaining pressure through consistent damage output, forcing opponents into losing trades regardless of their approach.

    The firepower package creates a fascinating dynamic: commanders get the satisfaction of massive single-shot damage while maintaining the ability to continuously pressure opponents without long reload times diminishing their battlefield presence.

    Gun Handling Characteristics

    The Buryan’s impressive firepower comes with notable trade-offs in gun handling:

    Mediocre Gun Handling: The gun handling characteristics are described as mediocre, suggesting less-than-stellar accuracy, longer aim times, or increased dispersion values compared to more refined weapons systems. This is the price for the devastating firepower.

    Limited Gun Depression: With only -6 degrees of gun depression, the Buryan falls short of the comfortable -7 to -8 degrees that enable effective hull-down gameplay. This limitation significantly restricts positioning options and makes the tank unsuitable for ridge-fighting tactics.

    Close-Range Focus: These gun handling limitations naturally push the Buryan toward close-range engagements where the poor gun depression matters less and where mediocre accuracy becomes less punishing. This design philosophy reinforces the tank’s role as a brawler rather than a support heavy.

    The gun handling trade-offs are deliberate design choices that focus the Buryan’s effectiveness into specific tactical situations rather than trying to create a jack-of-all-trades vehicle.

    Armor Profile and Survivability

    The Buryan brings solid defensive capabilities focused around its turret:

    Sturdy Turret: The turret features 250mm of frontal armor, providing robust protection that can reliably block shots from same-tier opponents when properly positioned. This solid turret armor is crucial for the Buryan’s close-range brawling role.

    Face-Hugging Capability: The combination of strong turret armor and limited gun depression actually works together in close-range situations. When fighting at point-blank range, the poor gun depression becomes less relevant while the sturdy turret becomes increasingly difficult for opponents to penetrate.

    HP Trading Advantage: The armor profile supports the Buryan’s role as an HP trading specialist. You can afford to take return fire because your turret can bounce shots, and when penetrations do occur, you’re dealing 490 HP while potentially receiving less.

    The armor focuses defensive strength where it matters most for the Buryan’s intended playstyle—enabling aggressive close-range positioning where the turret becomes the primary defense.

    Mobility Characteristics

    The Buryan’s mobility profile matches its close-range brawling role:

    Limited Top Speed: With a maximum speed of 36 km/h, the Buryan is not winning any races. This relatively modest top speed for a Tier IX heavy tank limits its strategic mobility and map presence.

    Adequate for Repositioning: While not fast, the mobility is described as adequate for short repositioning. The Buryan can move between nearby positions and adjust to local tactical situations without feeling completely immobile.

    No Flanking Potential: The 36 km/h top speed definitively limits flanking potential. This isn’t a tank for racing around the map seeking opportunities—it’s a vehicle for holding key positions and dominating local engagements.

    Frontline Fighter: The mobility package reinforces the Buryan’s identity as a frontline fighter that advances with the team, holds captured territory, and dominates close-range confrontations rather than seeking elaborate maneuvers.

    This mobility profile is honest about what the Buryan is and isn’t. You won’t be executing dynamic flanking maneuvers, but you will have sufficient mobility to stay relevant in evolving battle situations.

    Tactical Considerations

    The Buryan’s characteristics create clear tactical guidelines for effective play:

    Close-Range Dominance: The combination of high alpha, high DPM, and sturdy turret armor makes the Buryan exceptional in close-quarters combat. Getting within brawling range transforms the tank’s weaknesses into strengths.

    HP Trading Specialist: Few tanks can match the Buryan in sustained HP trading situations. The 490 alpha damage combined with good DPM and reliable turret armor creates consistently favorable trade ratios.

    Avoid Hilly Terrain: The -6 degrees of gun depression makes hilly positions a significant disadvantage. Commanders must consciously avoid terrain that would expose the tank’s inability to depress the gun adequately.

    Urban Warfare Excellence: City maps and urban environments play to the Buryan’s strengths perfectly. Close corners, limited sightlines, and flat terrain eliminate the tank’s weaknesses while maximizing its brawling advantages.

    Positioning Patience: The limited mobility means poor positioning decisions have lasting consequences. Commanders must think carefully about where to commit the Buryan since relocating takes time.

    Playstyle Implications

    The Buryan rewards commanders who embrace its role as a close-range brawling specialist:

    Aggressive Positioning: The tank excels when commanders push into close-range positions where the high alpha and good DPM can be fully leveraged. Passive play wastes the Buryan’s strengths.

    Map Awareness: Understanding which areas of each map feature flat terrain versus hilly sections becomes crucial. Route your advances through favorable terrain and avoid ridgelines.

    Calculated Trading: With 490 alpha damage, every shot matters significantly. The high DPM means you can afford to trade more frequently than typical high-alpha tanks, but shot placement still requires attention.

    Team Support: The limited mobility and poor gun depression mean the Buryan benefits greatly from teammate support. Fight alongside other heavies rather than trying to carry flanks independently.

    Commanders looking to master the Buryan should consider:

    • Prioritizing flat urban areas and close-range fighting positions
    • Aggressively pushing into brawling distance where firepower advantages dominate
    • Using the sturdy turret to absorb damage while dealing devastating return fire
    • Avoiding hilly maps or hill-dependent positions entirely
    • Maximizing the high DPM through sustained engagement rather than hit-and-run tactics
    • Planning advances carefully since limited mobility makes repositioning costly
    • Supporting teammates in taking and holding key positions rather than attempting solo plays

    Community Reception

    Initial community reactions to the Buryan have been generally positive, with players appreciating the focused design:

    Clear Identity: Players appreciate that the Buryan has a clear, focused identity as a close-range brawler. The strengths and weaknesses align logically with this role rather than trying to do everything moderately well.

    Comparison to Obj 590: Some community members have compared the Buryan to a “fattened up Object 590,” suggesting similarities in playstyle but with more bulk and possibly more armor.

    High-Alpha Appeal: The 490 alpha damage at Tier IX generates excitement among players who enjoy the psychological impact and trading advantages of high per-shot damage.

    Concerns About Meta: Some players worry about adding another high-alpha vehicle to the game, particularly one with good DPM alongside that alpha damage. Questions remain about whether the gun handling limitations adequately balance the firepower.

    What Sets the Buryan Apart

    The Buryan occupies a unique niche in the Tier IX heavy tank landscape:

    Rare Stat Combination: The pairing of 490 alpha damage with high DPM is genuinely uncommon at Tier IX. Most tanks sacrifice one for the other, making the Buryan’s combination special.

    Honest Design: The tank doesn’t try to hide its weaknesses or pretend to be versatile. It’s a close-range brawler through and through, with every characteristic supporting or necessitating that playstyle.

    Soviet Brawler Philosophy: The Buryan exemplifies classic Soviet heavy tank design—massive firepower and solid armor focused on direct confrontation, with mobility and gun handling as secondary concerns.

    Duel Specialist: In one-on-one situations on flat terrain, few Tier IX heavies can match the Buryan’s combination of alpha damage, DPM, and turret armor. It’s built specifically to win individual confrontations.

    What’s Next?

    As a Supertest vehicle, the Buryan’s final statistics and characteristics remain subject to change. Wargaming will need to carefully evaluate whether the combination of 490 alpha and high DPM is properly balanced by the gun handling and depression limitations.

    Key questions for the testing phase include:

    • Is the high alpha + high DPM combination too strong for close-range situations?
    • Do the gun handling limitations adequately balance the firepower advantages?
    • Can the -6 degrees of gun depression be worked around effectively on most maps?
    • Does the 36 km/h speed limit strategic impact sufficiently?
    • Will the turret armor prove reliable enough to enable the aggressive playstyle?
    • How does the tank perform in various matchmaking scenarios?

    The Supertest phase will reveal whether the Buryan’s focused design creates interesting tactical gameplay or results in a vehicle that’s either too dominant in its niche or too limited in application.

    Final Thoughts

    The Buryan represents focused tank design at its finest. Rather than trying to be adequate in all situations, it excels dramatically in close-range brawling while accepting significant limitations elsewhere. This design philosophy creates a vehicle with clear strengths and weaknesses that require intelligent positioning and tactical awareness to maximize.

    For commanders who enjoy aggressive heavy tank gameplay, direct confrontations, and the satisfaction of devastating alpha damage combined with sustained DPM, the Buryan offers an compelling package. The requirement to avoid hilly positions and the limited mobility create meaningful constraints that prevent the tank from being overpowering while ensuring that skilled positioning decisions are rewarded.

    The combination of 490 alpha damage, high DPM, and sturdy turret armor creates a dueling specialist that dominates close-range HP trading. If you embrace the limitations and position yourself in favorable terrain, the Buryan becomes an absolute monster in its preferred engagement range. The key is understanding that this isn’t a tank for every situation—it’s a specialized tool for close-range confrontations where its rare firepower combination can shine.

    Whether you’re excited about the high-alpha brawling potential or concerned about the poor gun depression and limited mobility, the Buryan offers a distinctive take on Soviet heavy tank design that prioritizes overwhelming firepower in close quarters above all else.

  • Terrifiant Tank Preview – World of Tanks Supertest

    Terrifiant Tank Preview – World of Tanks Supertest

    The World of Tanks Supertest has welcomed an impressive addition to the French heavy tank lineup: the Terrifiant, a Tier IX premium heavy tank that continues the design philosophy of France’s “alternative” heavy branch.

    terrifiant statistics

    Firepower: Punchy and Precise

    The Terrifiant brings a potent firepower package that balances alpha damage with accuracy:

    High Alpha Damage: The gun delivers 490 HP of damage per shot, placing the Terrifiant among the harder-hitting Tier IX heavy tanks. This alpha damage creates meaningful trades and allows the tank to punish exposed opponents decisively.

    Decent Accuracy: With 0.36 dispersion, the Terrifiant offers respectable accuracy for a heavy tank. This isn’t sniper-level precision, but it’s sufficient for reliable shot placement at medium ranges and enables more confidence in longer-distance engagements than many heavies can manage.

    Balanced Reload: With a 13.33-second reload time and a rate of fire of 4.5 rounds per minute, the Terrifiant maintains steady pressure on opponents while delivering significant per-shot impact. The balance between alpha damage and reload creates a comfortable rhythm for sustained engagements.

    Penetration Values: The gun features 246mm standard penetration and 276mm with premium ammunition, providing adequate penetration for most same-tier confrontations, though heavily armored targets may require premium rounds or careful aim at weak points.

    The firepower package creates a versatile weapon system capable of adapting to various engagement scenarios rather than being specialized for a single role.

    Armor Profile: Alternative Heavy Branch DNA

    The Terrifiant carries forward the armor characteristics that define the alternative French heavy line:

    Strong Frontal Hull Armor: With a nominal value of 150mm on the hull front, the Terrifiant features respectable frontal protection. While not impenetrable, the armor provides meaningful protection when properly angled and positioned, especially against lower-tier opponents.

    Robust Turret Armor: The turret boasts 250mm of frontal armor, creating a strong defensive position for hull-down gameplay. This substantial turret protection allows the Terrifiant to trade shots confidently when only the turret is exposed.

    Alternative Branch Philosophy: Like the AMX M4 54 and other vehicles from this line, the Terrifiant emphasizes frontal armor protection over mobility, creating a more traditional heavy tank experience than the autoloading oscillating-turret branch.

    Visual Connection: Community members have noted that the Terrifiant has visuals reminiscent of a Tier XI progression after the AMX M4 54, though the statistics remain firmly at the Tier IX level. This design continuity reinforces its position within the alternative heavy line.

    The armor profile supports aggressive positioning while maintaining the flexibility to adapt to defensive situations when necessary.

    Gun Depression: The French Advantage

    One of the Terrifiant’s most significant advantages is its exceptional gun depression:

    Outstanding -10° Depression: The maximum gun depression of -10 degrees is exceptional for any heavy tank, let alone a vehicle with this much armor. This depression capability opens up numerous positioning options that most heavy tanks simply cannot access.

    Terrain Mastery: The combination of -10 degrees depression, strong turret armor, and decent accuracy creates a vehicle that excels at ridge-fighting and utilizing terrain features. Hills and undulating terrain become significant tactical advantages rather than obstacles.

    Flexibility in Positioning: The exceptional gun depression means commanders can take aggressive positions on hills and ridges that would be impossible for tanks with standard -5 to -7 degrees of depression, expanding the Terrifiant’s tactical toolbox considerably.

    This gun depression is a defining characteristic that separates the Terrifiant from most heavy tanks and enables a more dynamic, terrain-focused playstyle.

    Mobility Characteristics

    The Terrifiant offers respectable mobility for a heavily armored Tier IX heavy tank:

    Top Speed: With a maximum forward speed of 33 km/h, the Terrifiant won’t be racing around the battlefield, but maintains adequate pace for a heavy tank. This speed allows for tactical repositioning without feeling completely immobile.

    Specific Power: The 17.5 hp/t power-to-weight ratio provides decent acceleration and ability to maintain speed over varied terrain. While not exceptional, this specific power ensures the Terrifiant remains relevant as battle lines shift.

    Balanced Mobility Package: The mobility characteristics suggest a tank designed for measured advances and tactical repositioning rather than aggressive flanking maneuvers. You can relocate when needed, but you won’t be executing rapid flanking movements.

    The mobility profile complements the Terrifiant’s role as a versatile heavy tank that can adapt to battlefield developments without being locked into static positions.

    Tactical Considerations

    The Terrifiant’s characteristics create clear tactical opportunities:

    Ridge-Fighting Excellence: The combination of -10 degrees gun depression, 250mm turret armor, and decent accuracy makes the Terrifiant exceptional at ridge-fighting. Seek out hills and terrain variation where this advantage can dominate.

    Versatile Positioning: Unlike specialized tanks limited to specific positions, the Terrifiant can function in hull-down positions, sidescraping situations, or frontal confrontations. This versatility allows adaptation to evolving battle situations.

    Measured Aggression: The strong frontal armor and punchy gun enable aggressive plays when opportunities present themselves, while the excellent gun depression provides escape routes and defensive options when pushes stall.

    Support or Lead: The Terrifiant can function as either a frontline leader using its armor to push positions, or as a second-line support tank leveraging its gun depression and accuracy to provide covering fire.

    Playstyle Implications

    The Terrifiant rewards commanders who can read terrain and leverage positioning advantages:

    Terrain-Focused Gameplay: Understanding map topography becomes crucial. Seek positions where the -10 degrees depression creates unfair advantages over opponents with limited gun depression.

    Hull-Down Priority: While the frontal armor is respectable, the turret armor is stronger. Prioritize hull-down positions where only the turret is exposed, maximizing survivability while maintaining offensive capability.

    Adaptable Approach: Don’t lock yourself into a single playstyle. The Terrifiant’s versatility means you should adapt to what each situation demands rather than forcing a predetermined approach.

    Shot Patience: The decent accuracy and meaningful alpha damage reward patient, aimed shots rather than snap-shooting. Take the extra second to ensure hits, especially at longer ranges.

    Commanders looking to master the Terrifiant should consider:

    • Prioritizing positions with terrain variation where gun depression advantages matter
    • Using the strong turret armor aggressively in hull-down situations
    • Leveraging the -10 degrees depression to engage from unexpected angles
    • Balancing aggressive pushes with the tactical retreats the gun depression enables
    • Taking advantage of the decent accuracy for longer-range engagements when needed
    • Supporting teammates by holding key terrain features that control map flow

    Community Reception

    Initial community reactions to the Terrifiant have been generally positive:

    Design Continuity: Players appreciate that the Terrifiant clearly belongs to the alternative French heavy branch, with design elements and capabilities that echo the line’s established identity.

    Visual Appeal: Community members have praised the visual design, with some noting it looks like it could be a Tier XI vehicle in terms of aesthetics, though the statistics remain appropriately balanced for Tier IX.

    Gun Depression Enthusiasm: The -10 degrees of gun depression generates particular excitement among players who understand how powerful this capability can be in skilled hands.

    Versatility Appreciation: The Terrifiant’s ability to function in multiple roles appeals to players who prefer flexible vehicles over one-trick specialists.

    What Sets the Terrifiant Apart

    The Terrifiant occupies a compelling niche in the Tier IX heavy tank landscape:

    Alternative Branch Identity: Clear lineage to the alternative French heavy line creates instant understanding of the tank’s philosophy and playstyle for experienced players.

    Gun Depression Elite: The -10 degrees of gun depression places the Terrifiant among the absolute elite for heavy tanks in this regard, creating tactical possibilities most heavies can’t access.

    Historical Significance: As a Franco-American hybrid design, the Terrifiant represents an interesting “what if” moment in tank development history, bringing a canceled project to virtual life.

    Versatile Heavy: Unlike specialized tanks that excel narrowly, the Terrifiant offers genuine versatility—functioning effectively in hull-down, frontal engagement, and support roles depending on situation demands.

    What’s Next?

    As a Supertest vehicle, the Terrifiant’s final statistics and characteristics remain subject to change. Wargaming will evaluate whether the combination of gun depression, armor, and firepower creates balanced gameplay or requires adjustment.

    Key questions for the testing phase include:

    • Is the -10 degrees gun depression too powerful when combined with the armor profile?
    • Does the 490 alpha damage with decent accuracy create too favorable trading scenarios?
    • Is the mobility sufficient to allow repositioning without making the tank too flexible?
    • How does the tank perform across various map types and terrain profiles?
    • Will the frontal armor prove adequate in the current high-penetration meta?
    • Does the reload time properly balance the alpha damage and gun handling?

    The Supertest phase will reveal whether the Terrifiant becomes a beloved addition to the alternative French heavy line or requires tuning to find its proper balance.

    Final Thoughts

    The Terrifiant represents the alternative French heavy philosophy executed at Tier IX with thoughtful design choices that create tactical depth. The exceptional -10 degrees of gun depression combined with strong turret armor and punchy firepower creates a vehicle that rewards terrain awareness and positioning intelligence.

    For commanders who appreciate versatile heavy tanks that can adapt to circumstances rather than being locked into rigid playstyles, the Terrifiant offers a compelling package. The requirement to understand terrain and leverage gun depression advantages creates a skill ceiling that rewards mastery while remaining accessible to competent players.

    The combination of French and American design elements creates something greater than the sum of its parts—a heavy tank that can fight from ridges, brawl in cities, or provide supporting fire depending on what each battle demands. If you embrace the terrain-focused gameplay that the exceptional gun depression enables, the Terrifiant becomes a powerful tool for controlling key positions and dictating engagement terms.

    Whether you’re excited about continuing the alternative French heavy line or intrigued by the historical Franco-American collaboration, the Terrifiant offers a distinctive take on Tier IX heavy tank design that prioritizes tactical flexibility and positioning advantages over specialized dominance in narrow circumstances.r in close quarters above all else.

  • FV226 Contradictious Review – instant double shots – World of Tanks

    FV226 Contradictious Review – instant double shots – World of Tanks

    fv266 tank

    Let’s compare it to the arguably the best double shot tank in the game, the Object 703 Version 2.

    Firepower

    SpecContradictiousObj. 703 II
    DPM2,0481,952
    Penetration225221
    Damage360390
    Caliber105122
    Shell velocity1,0001,150
    Ammo capacity8040

    So the DPM is about 5% higher then the 703, but it has less alpha damage and quite a bit less shell velocity, but that makes sense since the Contradictious uses AP ammo as standard, while 703 has APCR as standard ammo. Meaning Contradictious is not a great sniper, you’ll need to give much lead to your shots.

    Not a huge advantage, but what is nice to have is such a huge amount of ammo capacity of 80 shells, makes spamming double shots that much less risky to not run out of the shells by the end of the game and also you can balance your loadout with more premium rounds.

    Let’s take a look at the new mechanic this vehicle brings to the game, the instant double shots using the siege mode. If you are fighting such a vehicle, you can actually see in which mode the tank is currently.

    fv266 single shot mode

    Single shot mode

    fv266 siege mode double shots

    Double shot mode

    So, if both barrels are open, it means the tank is in siege mode where it can shoot from the both barrels without charging. If one barrel is open, it is in single shot mode.

    Unlike the 703 for example, it can’t use both barrels when in single shot mode, you fire one shell and then reload the whole shell and then you can shoot again.

    While in siege mode, a lot of characteristics change on the vehicle:

    SpecSiege modeStandard mode
    Aim time3.36s2.11s
    Dispersion1.150.35
    … moving0.010.2
    … tank treverse0.010.2
    … turret treverse0.010.12
    Top speed20 km/h36 km/h

    Essentially, you get a lot slower and a lot more inacurrate while in siege mode. You also get a different reticle in this mode:

    fv266 reticle

    You get this kind of a reticle with 2 green lines on each side , each line represents a barrel.

    If a line is solid, it means it is not obstructed and has free line of fire.

    If line is dashed, it means barrel is blocked by terrain.

    While this reticle should help you out not to shoot while one of your barrels is blocked, I much prefer a standard reticle that other double barrel tanks are using.

    Mobility

    SpecFV226Obj. 703 II
    Top speed36 km/h38 km/h
    Reverse speed12 km/h15 km/h
    Power/weight1512.5
    Weight 70 tons60 tons

    Mobility wise is solid for a heavy tank, interestingly it has exactly the same ground resistances as the 703 version 2. With good power to weight ratio it reaches the top speed without any problems, but the reverse speed is quite slow and it will be hard to disengage.

    Armor

    SpecFV226Obj. 703 II
    Hull armor150/70/60140/100/60
    Turret armor250/120/90220/120/90

    While the 703’s turret and hull are really good for a tier 8, the Contradictious has even better hull and turret that will be hard to penetrate even for tier 9s and 10s.

    fv266 frontal armor

    It has around 230 mm of effective armor in main part of the hull, the lower plate has around 160 mm, so it can be penned even by tier 7s quite reliably. The hull armor on the front can take quite a beating from lower and same tier tanks, they will have hard time going through it with standard ammo.

    Turret is the star of the show, around 330 mm of armor, even gold rounds from tier 10s will not penetrate most of the time which is amazing. At the top you have 2 weakspots around with 150 mm of armor, also they are visible when using your gun depression.

    fv266 using gun depression armor

    If you are going to use all 10 degrees of gun depression, your hull becomes godlike, with around 340 mm of effective armor. This tank is an absolute god on the ridgeline, like a Krangvagn on tier 10.

    fv266 side armor

    Side and rear tho are very weak indeed, even some HESH rounds will be able to go through your armor.

    Miscellaneous

    SpecFV226Obj. 703 II
    Stationary camo3.486.27
    After firing0.691.19
    Moving camo1.773.13
    Shell cost1,2001,180
    View Range370350

    This tank has absolutely terrible camo rating, you will get spotted by anything everytime, but at least you are not as blind as the 703 with 370 meters view range, still nowhere a good view range tho.

    Shell cost is quite high also when you consider that it has 30 less alpha damage and it’s still more expensive then 703’s shells. It does impact the profitability of the vehicle.

    Tips

    Ridgelines make you a god in equal tier games, use them as much as possible, the only tank that could run your day is something like the BZ-176 with HE rounds.

    You are a lot more accurate with the single shot mode, use it on middle to long ranges, while in close quarter combat you can rely more on the siege mode with double shots.

    Since you don’t have the ability to use both of the barrels in the single shot mode, you are not as strong to hold your own in tricky situations such as the 703 can. Stick to your teammates to support you when you are reloading especially double shots.

    Conclusion

    Overall a great tier 8 premium heavy and a good credit maker. Gun is reliable source of dealing damage on longer ranges with great accuracy with single shots, while it can deal devastating amounts on damage with double shots in close range engagements. Packed with best in class turret armor, it can whittle down it’s opponents on the ridgeline with ease.

    Check our review of the another 2024 lootbox tank:

  • DZT-159 Review – Best premium at tier 9? World of Tanks

    DZT-159 Review – Best premium at tier 9? World of Tanks

    Review of the new tier 9 premium, the DZT-159, in world of tanks, which on paper seems like a very solid tank, but not as good as the best tier 9 premium, Object 752. A bit lower DPM compared to WZ-120, but with great turret armor and rocket boosters, it poses a threat to same and lower tier vehicles. It brings a new way of playing medium tanks and you can have a lot of fun with it.

    DZT-159 tank

    Wargaming is not stopping with releasing new tier 9 premium tanks, just in the contrary, they are picking up the pace.So, this is the new Chinese tier IX medium tank with rocket boost mechanic. Compared to the rocket boosters equipped on the heavy tanks, these packs are shorter in duration, but there are more of them avaliable for use, 7 pops at 5 second duration.

    List of content:

    Firepower

    SpecDZT-159WZ-120
    DPM2,353.442,503.20
    Penetration260 mm249 mm
    Damage per shot440440
    Rate of fire5.355,69
    Reload time11.2210.55
    Caliber122122
    Shell velocity1,150m/s950m/s
    Ammo capacity4040
    Shell cost1,2051,065

    We’ll grab the tech tree WZ-120 as a guide, so it seems like there are some characteristics that are better such as the penetration and the shell velocity on the DZT and there are those that are worse such as the DPM, but not by much.

    I would tho prefer this kind of gun from the DZT since I value the penetration much more then the DPM and also shell velocity of only 950m/s feels clunky to snipe with on longer ranges.

    Overall the DZT’s gun is a very reliable one, hits hard, DPM is not the best in class, but you can definitely make it work.

    Gun Handling

    SpecDZT-159WZ-120
    Aim Time 2.59s2.59s
    Dispersion0.380.36
    … moving0.20.14
    … tank treverse0.20.14
    … turret treverse0.080.12
    Depression73

    Gun handling is fine for a tier 9 with such a hard hitting gun, while the dispersion values are not quite as good as on the WZ, aim time is reasonable and the best thing about this tank is the gun depression at great 7 degrees. It allows you to work a ridge line quite a bit easier and overall to be a lot more flexible.

    Quite an unusual thing that the chinese tank has a good amount of gun depression, but I guess WG thought I could be a good idea since the tank has great turret armor.

    Mobility

    SpecDZT-159WZ-120
    Forward speed40 km/h60 km/h
    Reverse speed15 km/h20 km/h
    Power/weight15.6117.05
    Turret treverse26.0743.81
    Tank treverse41.7247.98

    Quite of a slow medium actually at the today’s standards, only 40 km/h top speed and also the reverse speed is not great at only 15, makes pulling back quite slow. Turret treverse is very bad at only 26 degrees, almost half as slow compared to something like the WZ-120, tank treverse is not bad tho.

    With such a mediocre treverse you might get into the situation where other mediums can easily outmaneuver you and shut you down.

    This is all true, but let’s not forget about the tank’s main feature and that is the rocket boost mechanic. It helps you a lot to get into the position at the start of the game, or boost around the battlefield to relocate. Be aware tho, only 7 charges, each lasting 5 seconds, but they boost your speed up to 68 km/h, quite a bit more then when used on heavy tanks.

    Armor

    DZT-159 frontal armor

    This is the highlight of this vehicle, it is a lot more heavily armored then a standard other medium tank.

    Turret effective thickness is around 310 mm, even tier 10s will have a hard time going through your turret with standard ammunition, but with gold they will find a lot more success, so keep an eye at which ammo the enemy is using. Turret is very solid for hull down positions, but you have 2 commander hatches that can be penned even by tier 7s.

    Hull armor is not that great, around 190 mm of effective armor, it can pull of some bounces against lower tiers, but it is nowhere reliable.

    DZT-159 side armor

    Sides and rear are quite poorly armored, 80mm on the hull’s side and 50mm on the rear. Side of the turret has around 200 mm of effective armor, it can pull off some bounces.

    Use the terrain as cover as much as you can do hide your mediocre hull and show only a very thick turret. 7 degrees of gun depression will help you out with using different types of terrain to your advantage. If you are using your gun depression you even hide your turret’s hatches, meaning you don’t have any weakspots in that situation.

    Tips

    At the start of the game rush into the position before your enemies using the rocket boosters and catch them by surprise, but don’t use all of them at the start, leave at least 4 rocket charges for later stages in the game.

    Use rocket boosters to run away or relocate on the battlefield more quickly. Another use can can be to ram the vehicle with the less weight then you, this will also make use of the controlled impact crew skill.

    Your DPM is not high, in most cases you will lose a 1v1, stick to your teammates where they can support you while you reload.

    While you don’t have full 10 degrees of gun depression, you can’t really work every ridge line, but try to hide your hull as much as you can with the terrain, as well as your turret weakspots to deal damage effectively.

    Conclusion

    A very capable tank at tier 9, one of the best premiums at this tier and probably the best tank from 2024 christmas lootboxes. As every tier 9 premium, it earns a lot of credits, but keep in mind the shell cost is quite high at over 1,2k per shot. With the great turret and rocket booster, it add a new way of playing mediums and it is hell of a fun.

    Check out our review of another 2024 lootbox premium tank at tier 9: