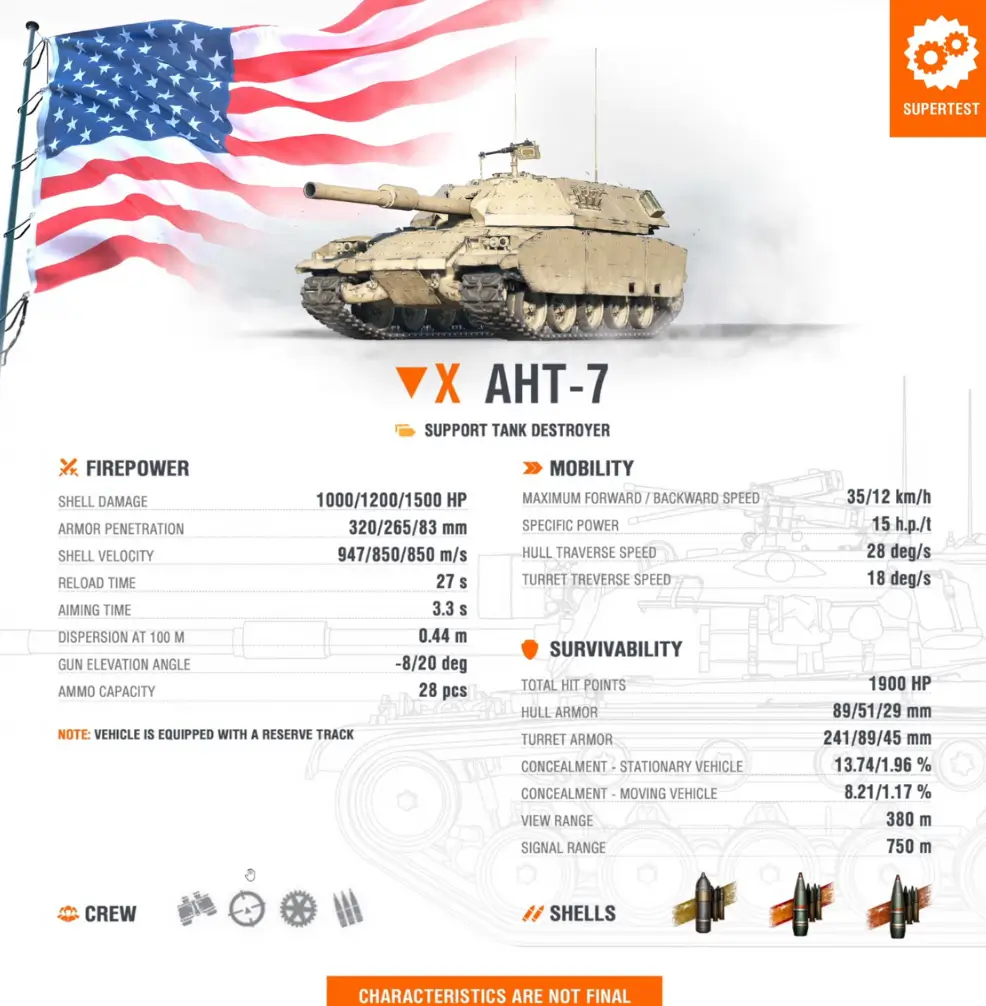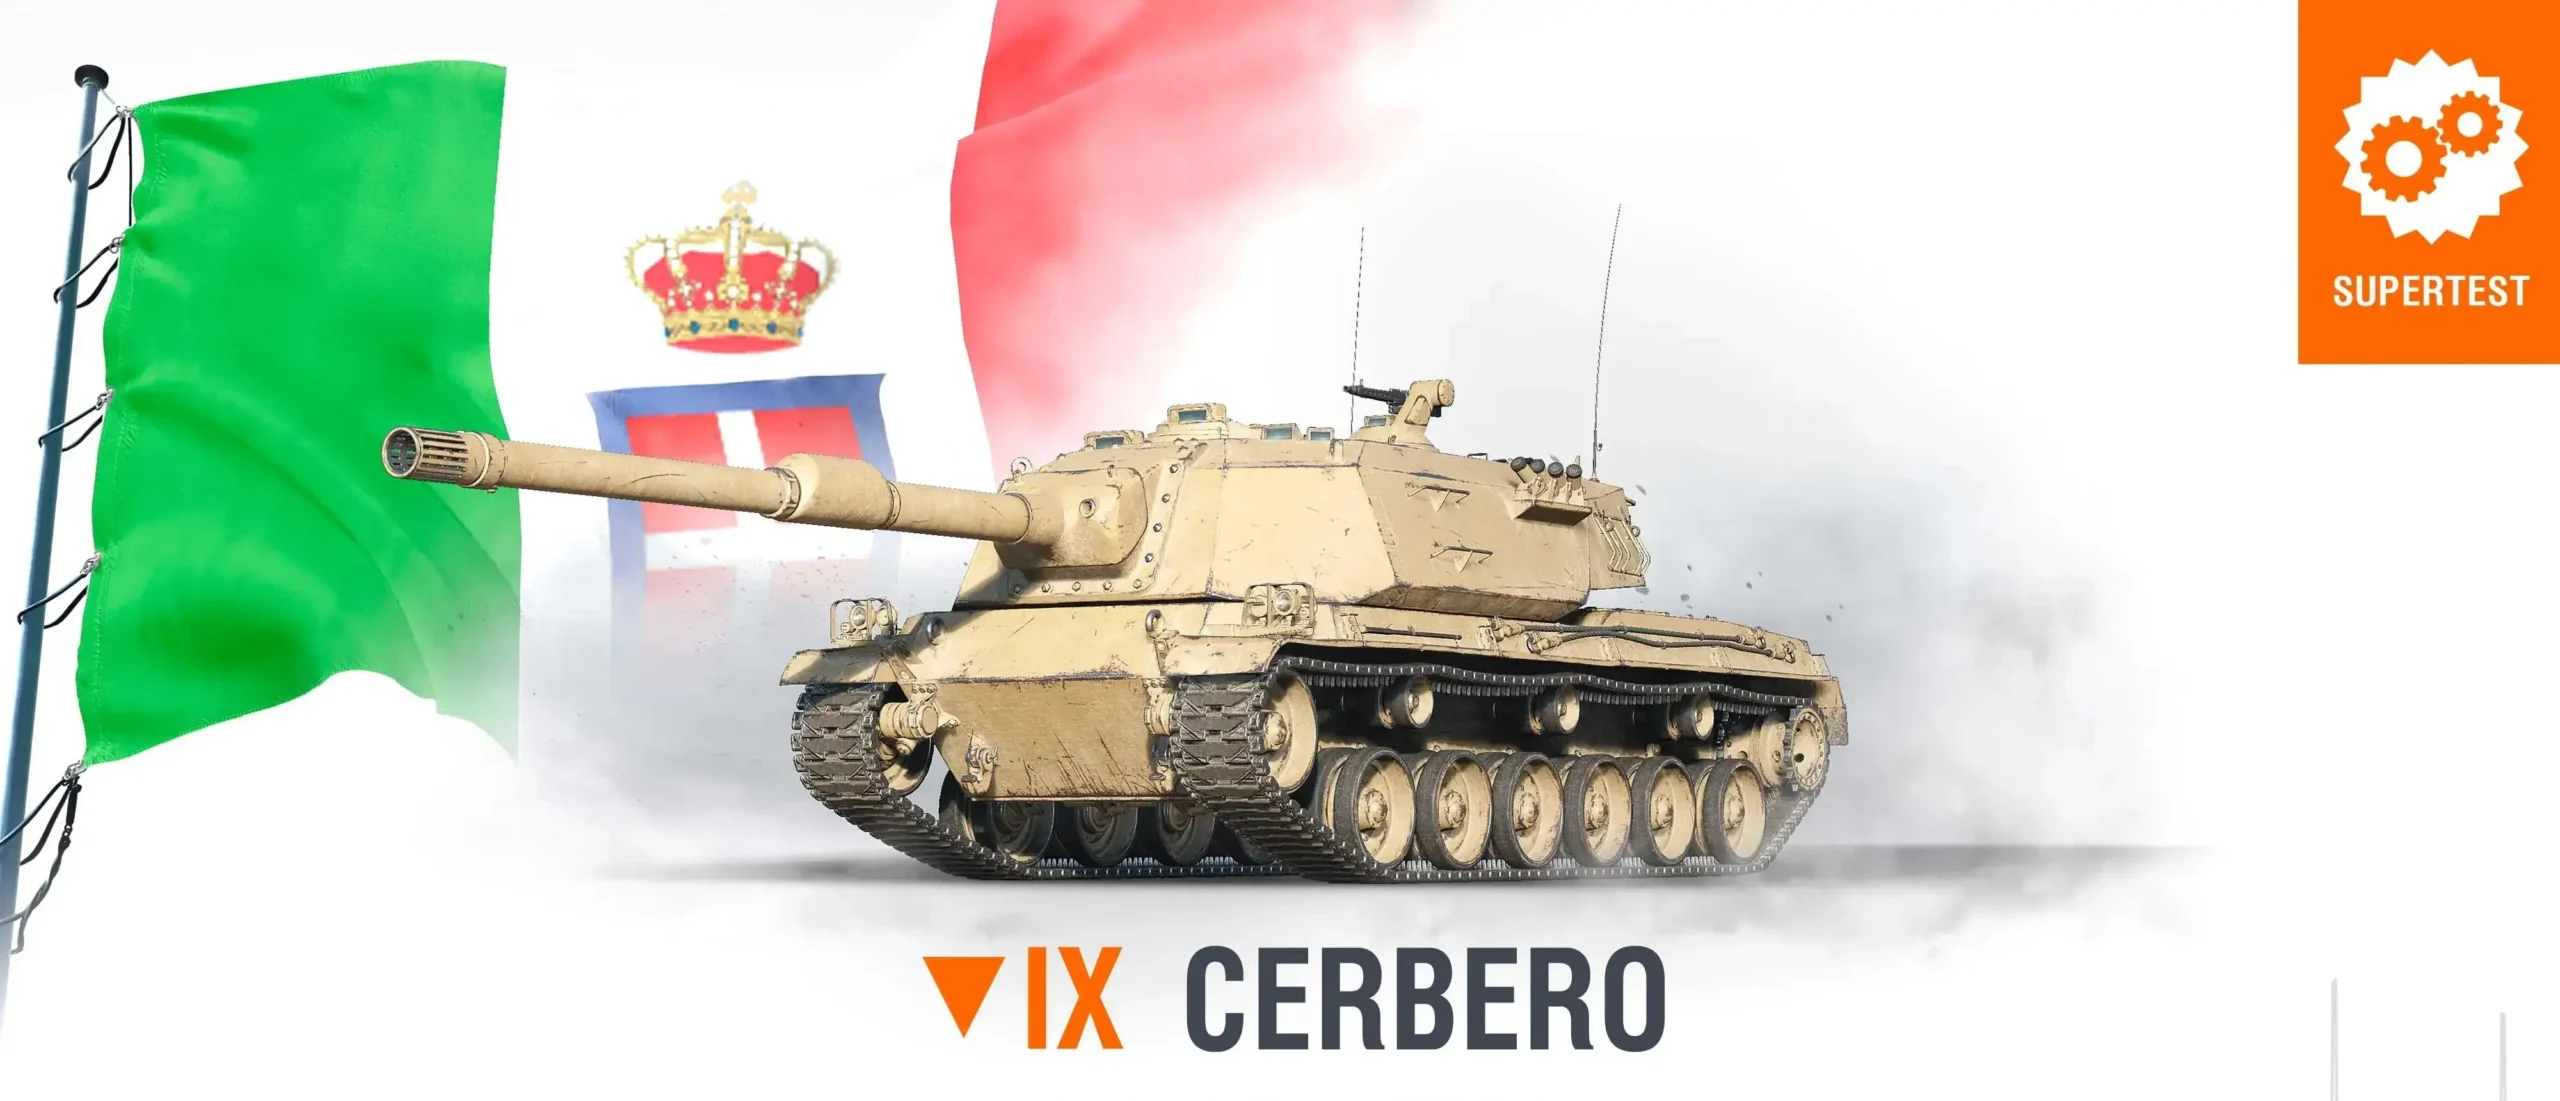
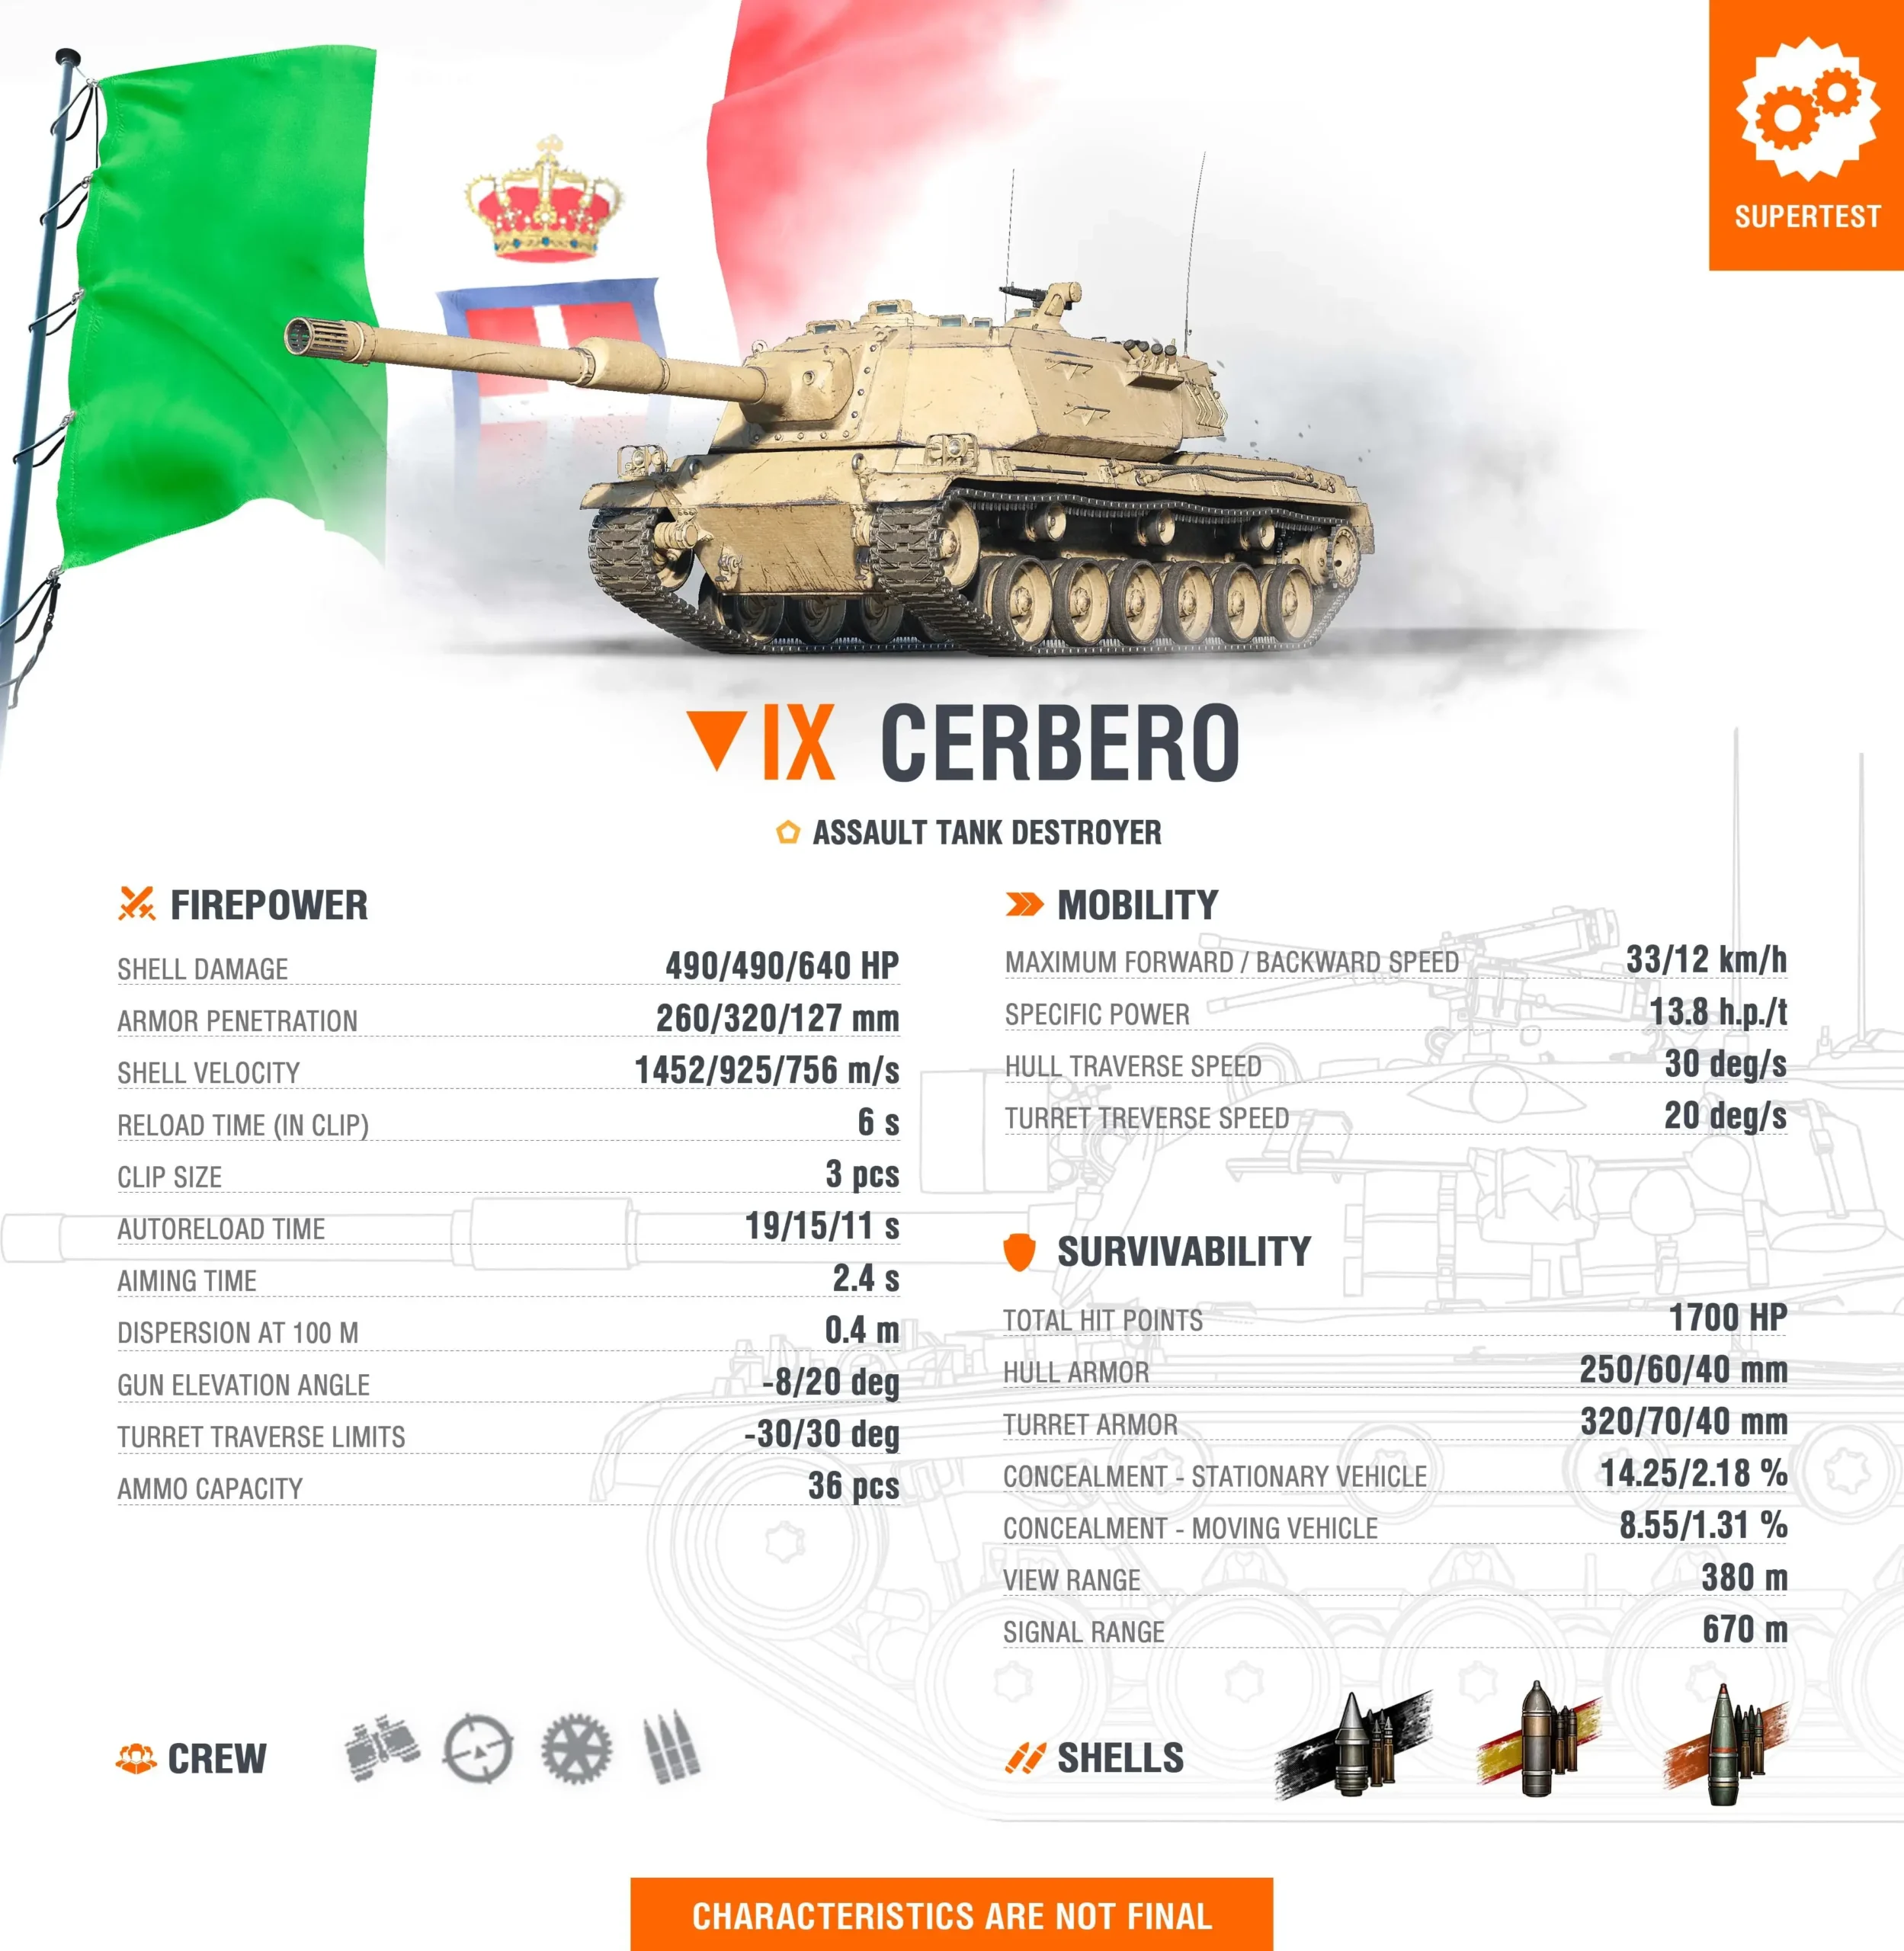
The World of Tanks Supertest has welcomed an intriguing addition to the Italian tank destroyer lineup: the Cerbero, a Tier IX assault tank destroyer whose defining characteristic is its three-shell reverse autoreloader system. For players who appreciate Italian armored design but want something fundamentally different from the five-shell magazines of the tech tree Minotauro line, the Cerbero offers a compelling alternative built around consistent firepower delivery, frontline durability, and tactical flexibility through its unique reload mechanics.
Three-Shell Reverse Autoreloader: Consistent Firepower
The Cerbero’s primary identity revolves around its innovative ammunition system:
Three-Shell Reverse Autoreloader: Unlike traditional autoloaders that reload all shells equally or autoreloaders where the first shell reloads fastest, the Cerbero features a reverse autoreloader where the last (third) shell in the magazine reloads most quickly. This mechanic creates unique tactical considerations.
Consistent Firepower Philosophy: The reverse autoreloader system is specifically designed to provide “consistent firepower regardless of tactical circumstances.” This means the Cerbero maintains combat effectiveness whether firing single shots or deploying the full three-shell burst.
No Subsequent Disadvantage: The system provides “the added benefit of being able to use the first two shells at the start of an engagement with no subsequent disadvantage.” Commanders can commit partial clips without creating extended vulnerability windows that plague traditional autoloaders.
Fastest Third Shell Reload: The last shell in the magazine reloads faster than the first two shells, creating an inverted reload priority compared to standard autoreloaders. This characteristic encourages aggressive use of the first two shells while knowing the third will return to combat readiness quickly.
Flexible Engagement Options: The reverse autoreloader enables both single-shot trading (functioning like a conventional gun) and burst damage delivery (deploying two or three shells when opportunities arise) without forcing commanders to commit to one playstyle.
490 HP Alpha Damage: Meaningful Impact
The Cerbero delivers respectable per-shot damage:
490 HP Per Shot: The alpha damage is competitive for Tier IX and matches many heavy tanks at this tier. Each shell carries meaningful impact, creating favorable trades and enabling efficient cleanup of wounded opponents.
Three-Shell Burst Potential: When deploying the full magazine, the Cerbero can deliver 1,470 HP of damage. This total burst damage is respectable and sufficient to eliminate many wounded enemies or severely punish opponents who remain exposed.
Heavy Tank Alpha Parity: The 490 HP damage matches or exceeds many Tier IX heavy tanks, enabling the Cerbero to trade favorably in direct confrontations. Opponents must respect each Cerbero shell as a meaningful HP threat.
Efficient Target Finishing: The 490 HP alpha is perfectly positioned to finish opponents who have taken moderate damage. Targets sitting at 500-900 HP can be eliminated with two well-placed Cerbero shots, enabling efficient cleanup work.
Psychological Pressure: The combination of respectable alpha and the ability to deploy it in rapid bursts creates psychological pressure. Opponents facing a Cerbero must constantly consider whether it will fire one shot and retreat or commit multiple shells.
Good Penetration Values: Confident Engagement
The Cerbero brings meaningful penetration characteristics:
260mm Standard APCR Penetration: The standard ammunition features APCR rounds with 260mm of penetration—competitive values for Tier IX that enable reliable engagement against most opponents without premium ammunition dependency.
320mm HEAT Premium Penetration: The premium HEAT round provides 320mm of penetration, sufficient for challenging heavily armored opponents and penetrating specific weak spots on super-heavy tanks. However, community reception suggests this value may be considered modest for a Tier IX tank destroyer.
127mm HE Penetration: The HE round offers 127mm of penetration, providing a viable option against lightly armored targets and enabling module damage/crew injuries when direct HP damage is difficult to achieve.
APCR Standard Characteristics: APCR standard ammunition travels at high velocity, reducing lead time on moving targets and maintaining penetration better over distance compared to standard AP rounds. This characteristic supports accurate fire at medium ranges.
Penetration Concerns: Community discussion has noted that “it takes a certain kind of optimism to call 320 HEAT good pen for a T9 tank destroyer,” suggesting the premium penetration may be viewed as insufficient compared to dedicated sniping tank destroyers.
Good Frontal Armor: Frontline Capability
The Cerbero brings meaningful protection for an assault tank destroyer:
Good Frontal Armor on Hull: The Cerbero is specifically described as having “good frontal armor on its hull,” enabling it to absorb shots when properly positioned and supporting the assault tank destroyer classification.
Frontline Operation Capability: The armor is sufficient to “stay on the frontline,” indicating the Cerbero is designed to operate at the forefront of advances rather than from second-line sniping positions.
Assault Tank Destroyer Classification: The explicit “assault tank destroyer” designation emphasizes this vehicle is built for close-to-medium range direct combat rather than long-range fire support.
Armor Limitations: While the frontal armor is good, the absence of terms like “excellent” or “exceptional” suggests the Cerbero’s protection is solid but not impenetrable. Proper angling and positioning remain essential.
Durability Philosophy: The combination of good frontal armor and the reverse autoreloader’s consistent firepower creates a vehicle designed to sustain frontline presence, trading shots confidently while maintaining damage output.
Limited-Rotation Turret: Tactical Flexibility with Constraints
The Cerbero features a turret with restricted traverse:
Limited-Rotation Turret: The turret does not rotate a full 360 degrees, instead offering limited traverse angles. This characteristic is common among Italian tank destroyers from Tier VII onward and creates specific tactical considerations.
Improved Over Turretless: While limited, the turret traverse is a significant improvement over completely turretless tank destroyers, enabling target tracking without constant hull repositioning within the turret’s arc.
Arc Management Requirement: Success requires maintaining hull positioning that keeps targets within the turret’s traverse limits. Enemies who flank beyond the turret arc force hull rotation or repositioning.
Positioning Discipline: The limited-rotation turret demands careful initial positioning. Commanders must anticipate likely enemy approach angles and position the hull to maximize the turret’s effective coverage.
Italian TD Tradition: The limited-rotation turret continues the design philosophy of the Italian tank destroyer line, balancing between turretless vehicles and fully turreted tank destroyers.
Adequate Mobility: Frontline Responsiveness
The Cerbero offers functional mobility for its role:
33 km/h Maximum Forward Speed: The top speed is modest but adequate for an assault tank destroyer. The Cerbero won’t reach positions as quickly as medium tanks but maintains reasonable responsiveness for frontline repositioning.
Adequate Mobility Classification: The explicit mention of “adequate mobility” suggests the Cerbero provides functional movement characteristics without exceptional speed or agility. The vehicle is competent but not particularly mobile.
Frontline Redeployment: The mobility is sufficient for relocating between frontline positions, responding to developing flanks, and extracting from unfavorable situations when necessary, though slower opponents may catch up.
Assault TD Appropriate: The mobility matches the assault tank destroyer role—fast enough to advance with team pushes and maintain frontline presence, but not so fast as to enable aggressive flanking or rapid map traversal.
Trade-Off Balance: The modest mobility is balanced against the good frontal armor and consistent firepower, creating a vehicle that advances deliberately rather than racing to forward positions.
Reverse Autoreloader Mechanics: Tactical Implications
The unique reload system creates distinctive gameplay patterns:
Last Shell Fastest Reload: With the third shell reloading faster than the first two, the Cerbero encourages using the initial shells aggressively while knowing combat readiness returns quickly.
Single-Shot Viability: The system enables effective single-shot trading without the extended reload penalties of traditional autoloaders. Fire one shell, retreat, and the magazine replenishes faster than opponents expect.
Burst When Needed: When opportunities arise—enemies crossing open ground, distracted opponents, or wounded targets—the Cerbero can deploy two or three shells rapidly without subsequent disadvantage.
No Clip Commitment Pressure: Unlike autoloaders that suffer extended reloads after partial clip usage, the reverse autoreloader removes the pressure to commit entire magazines, enabling more flexible engagement choices.
Consistent Threat Level: The fast third-shell reload ensures the Cerbero maintains consistent threat potential throughout battles rather than alternating between devastating and vulnerable states.
Methodical Frontline Pressure
The Cerbero’s design philosophy emphasizes steady frontline presence:
Assault Tank Destroyer Identity: The Cerbero is designed to operate at the frontline, using its good armor and consistent firepower to create pressure and punish opponents who challenge its position.
Armor-Supported Advances: The good frontal armor enables the Cerbero to advance with team pushes, absorbing shots while delivering 490 HP counters through its reverse autoreloader system.
Flexible Fire Delivery: The unique reload mechanics enable the Cerbero to adapt its fire pattern to situations—single shots when trading conservatively, two-shell bursts for medium opportunities, three-shell commitments for critical moments.
Limited-Arc Management: Success requires positioning that maximizes the turret’s limited traverse coverage while maintaining frontal armor toward primary threats. This discipline is essential for effective frontline operation.
Sustained Combat Presence: The reverse autoreloader’s design philosophy—consistent firepower regardless of circumstances—enables the Cerbero to maintain frontline engagement throughout extended battles.
Tactical Considerations
The Cerbero’s unique characteristics create specific tactical opportunities:
Shell Count Awareness: Constantly monitor which shell is loaded. The fast third-shell reload creates different tactical options compared to having only one or two shells available.
Burst Timing: Deploy two or three shells when enemies are committed to other engagements, crossing open ground, or presenting vulnerable angles. Single-shot trade when situations are ambiguous.
Hull Positioning: Position the hull to maximize turret traverse coverage over likely enemy approach angles. Anticipate where opponents will appear and pre-position accordingly.
Armor Angling: While the frontal armor is good, proper angling remains important. Don’t rely solely on raw thickness—use geometry to maximize effective protection.
Mobility Limitations: Accept that the 33 km/h top speed limits rapid redeployment. Choose initial positions carefully since correcting poor positioning takes time.
Playstyle Implications
The Cerbero rewards commanders who embrace adaptive frontline gameplay:
Frontline Commitment: The Cerbero thrives at the frontline where its good armor, consistent firepower, and reverse autoreloader mechanics create maximum advantage. Avoid passive second-line sniping.
Reload Mechanics Mastery: Understanding when to fire one shell versus committing two or three is the highest-skill expression of Cerbero gameplay. Master the reload system’s nuances.
Position-First Mentality: The limited-rotation turret and modest mobility demand careful initial positioning. Think several moves ahead—where will enemies approach, where should the hull face, what escape routes exist?
Flexible Aggression: The reverse autoreloader enables aggressive plays that would be risky for traditional autoloaders. Use this flexibility to capitalize on opportunities other vehicles must decline.
Commanders looking to master the Cerbero should consider:
- Learning the exact reload timings for each shell position in the magazine
- Practicing hull positioning to maximize turret traverse coverage over battle areas
- Developing judgment for when single shots suffice versus when burst damage is justified
- Using the good frontal armor to lead team advances and create space
- Understanding that the third shell’s fast reload enables more aggressive first-shot usage
- Accepting the 33 km/h mobility limitations and choosing positions that don’t require rapid relocation
- Reserving HEAT ammunition for heavily armored targets given the modest 320mm penetration
- Reading battlefield developments to position where the limited turret arc covers primary threats
Community Reception
Initial community reactions to the Cerbero reveal polarized perspectives:
“Reverse Autoreloader is Interesting”: Many players expressed curiosity about the reverse autoreloader mechanics, viewing the system as a creative alternative to standard Italian autoreloader designs.
Penetration Criticism: Community discussion immediately focused on the 320mm HEAT penetration, with comments noting “it takes a certain kind of optimism to call 320 HEAT good pen for a T9 tank destroyer.” Comparisons to the Controcarro’s premium ammunition suggest the Cerbero’s penetration is viewed as insufficient.
“Another Limited-Rotation Turret”: Some players expressed fatigue with Italian tank destroyers featuring limited turret traverse, questioning whether the mechanic creates more frustration than tactical depth.
Assault TD Classification Questions: Community members debated whether the Cerbero’s characteristics truly support effective assault tank destroyer gameplay or if the modest mobility and limited turret create frontline vulnerabilities.
Premium/Reward Speculation: With no tech tree placement mentioned and the existing Italian TD tech tree already established, speculation immediately turned to whether the Cerbero would be a premium vehicle, reward tank, or potential branch addition.
What Sets the Cerbero Apart
The Cerbero occupies a unique position in the Tier IX tank destroyer landscape:
Reverse Autoreloader Innovation: The Cerbero is the first tank destroyer to feature a reverse autoreloader where the last shell reloads fastest, creating gameplay patterns distinct from both traditional autoloaders and standard autoreloaders.
Three-Shell Consistency: Unlike the five-shell magazines of tech tree Italian tank destroyers, the three-shell system provides more consistent firepower delivery without extended vulnerability windows after clip depletion.
Assault TD with Modest Mobility: The combination of assault classification with only 33 km/h top speed creates a deliberate, position-focused playstyle rather than the aggressive rushes enabled by faster assault vehicles.
Flexible Firepower Philosophy: The reverse autoreloader’s design specifically enables “consistent firepower regardless of tactical circumstances,” distinguishing the Cerbero from autoloaders that force specific engagement patterns.
Good Armor Without Excellence: The Cerbero brings meaningful protection without the exceptional armor of super-heavies, creating a vehicle that can absorb some punishment but must still leverage positioning and tactics.
What’s Next?
As a Supertest vehicle, the Cerbero’s characteristics remain subject to adjustment. Key questions for testing include:
- Will the 320mm HEAT penetration be increased to address community concerns about inadequate premium ammunition performance?
- What are the exact reload timings for each shell position in the reverse autoreloader?
- Does the good frontal armor provide sufficient survivability for effective assault tank destroyer gameplay?
- How does the limited-rotation turret perform in dynamic frontline situations?
- Will this be a premium vehicle, reward tank, or addition to the existing Italian TD branch?
- Can the 33 km/h mobility enable the Cerbero to fulfill its assault tank destroyer role effectively?
- Does the three-shell reverse autoreloader provide adequate burst damage compared to larger-magazine alternatives?
Final Thoughts
The Cerbero represents an ambitious attempt to evolve Italian tank destroyer design through innovative reload mechanics. By introducing a reverse autoreloader where the last shell reloads fastest, Wargaming has created a vehicle that addresses the consistency concerns of traditional autoloaders while maintaining the burst damage potential that defines the Italian tank destroyer philosophy.
For commanders who appreciate frontline combat, enjoy adaptive gameplay that alternates between single shots and burst damage, and value consistent firepower over devastating but inconsistent performance, the Cerbero offers intriguing potential. The reverse autoreloader mechanics create genuinely different tactical considerations compared to both standard guns and traditional autoloaders.
However, the Cerbero faces significant challenges. The 320mm HEAT penetration has drawn immediate criticism as insufficient for a Tier IX tank destroyer, potentially forcing excessive premium ammunition usage or limiting engagement options against heavily armored opponents. The modest 33 km/h mobility combined with the limited-rotation turret creates positional vulnerabilities that skilled opponents will exploit. If the initial positioning proves poor, correcting the mistake takes significant time.
The three-shell magazine provides less total burst damage than the five-shell systems of tech tree Italian tank destroyers, creating questions about whether the consistency advantages of the reverse autoreloader adequately compensate for reduced clip potential. In situations where maximum burst damage determines battle outcomes, the Cerbero may find itself at a disadvantage.
Whether you’re excited about innovative reverse autoreloader mechanics or skeptical about whether 320mm premium penetration and modest mobility can support effective Tier IX gameplay, the Cerbero undeniably offers something different. If Wargaming successfully balances the penetration values, reload timings, and armor profile, the Cerbero could become a favorite for players who enjoy position-focused frontline combat with flexible firepower delivery.
For those who have wanted an Italian tank destroyer that maintains consistent threat potential throughout battles rather than alternating between devastating clips and extended vulnerability windows, the Cerbero might be exactly what you’ve been waiting for.
Characteristics Are Not Final — all information sourced from World of Tanks Supertest announcements.