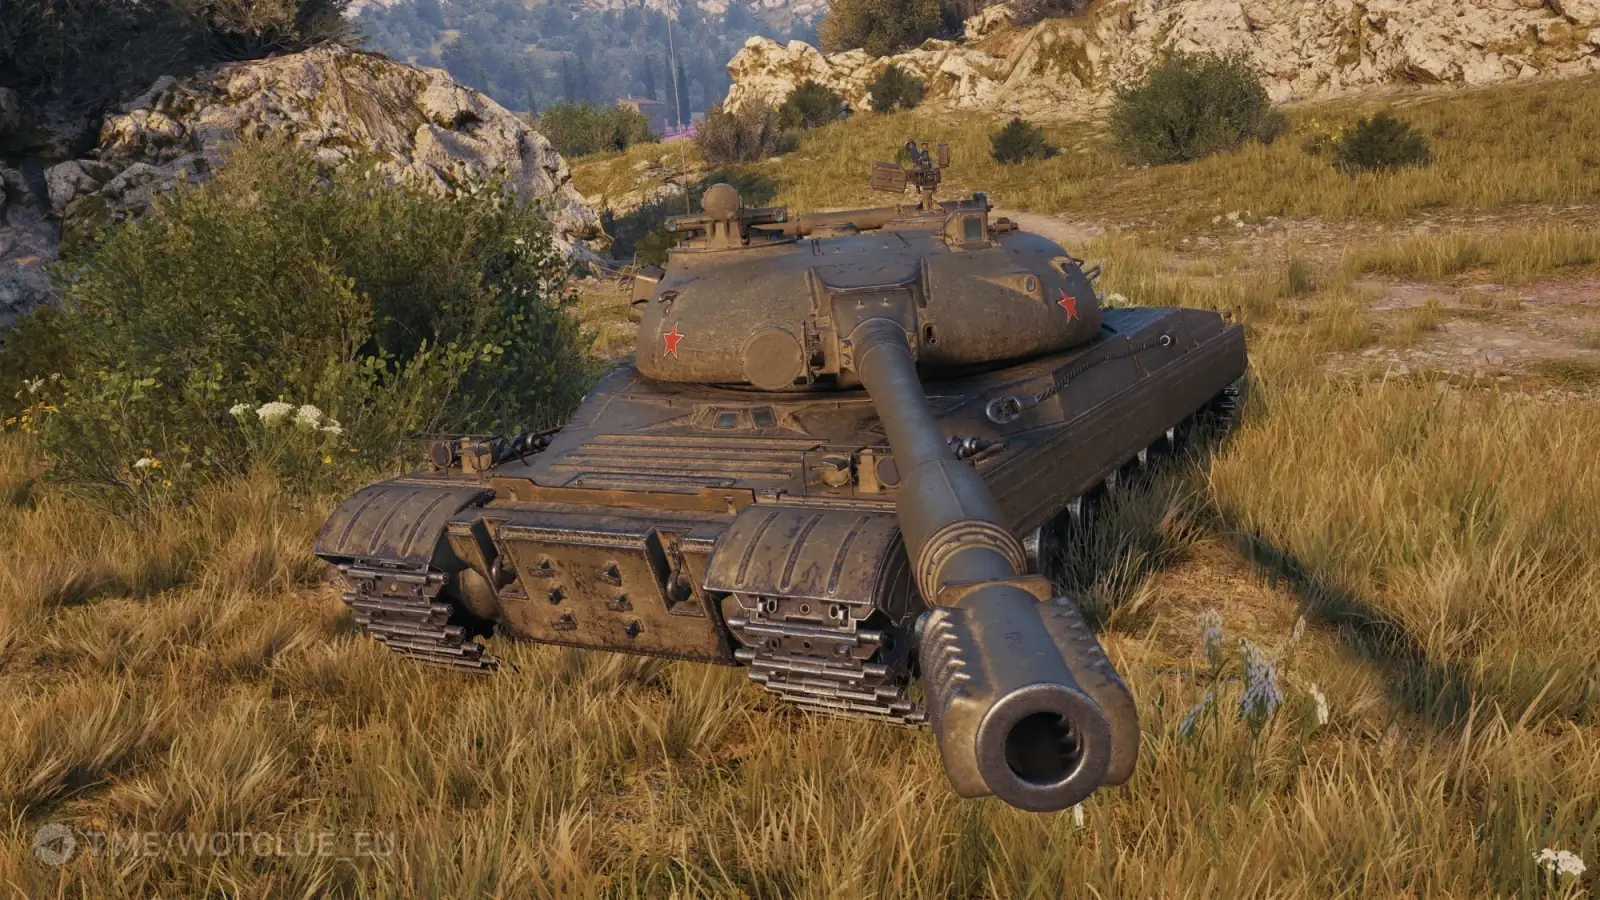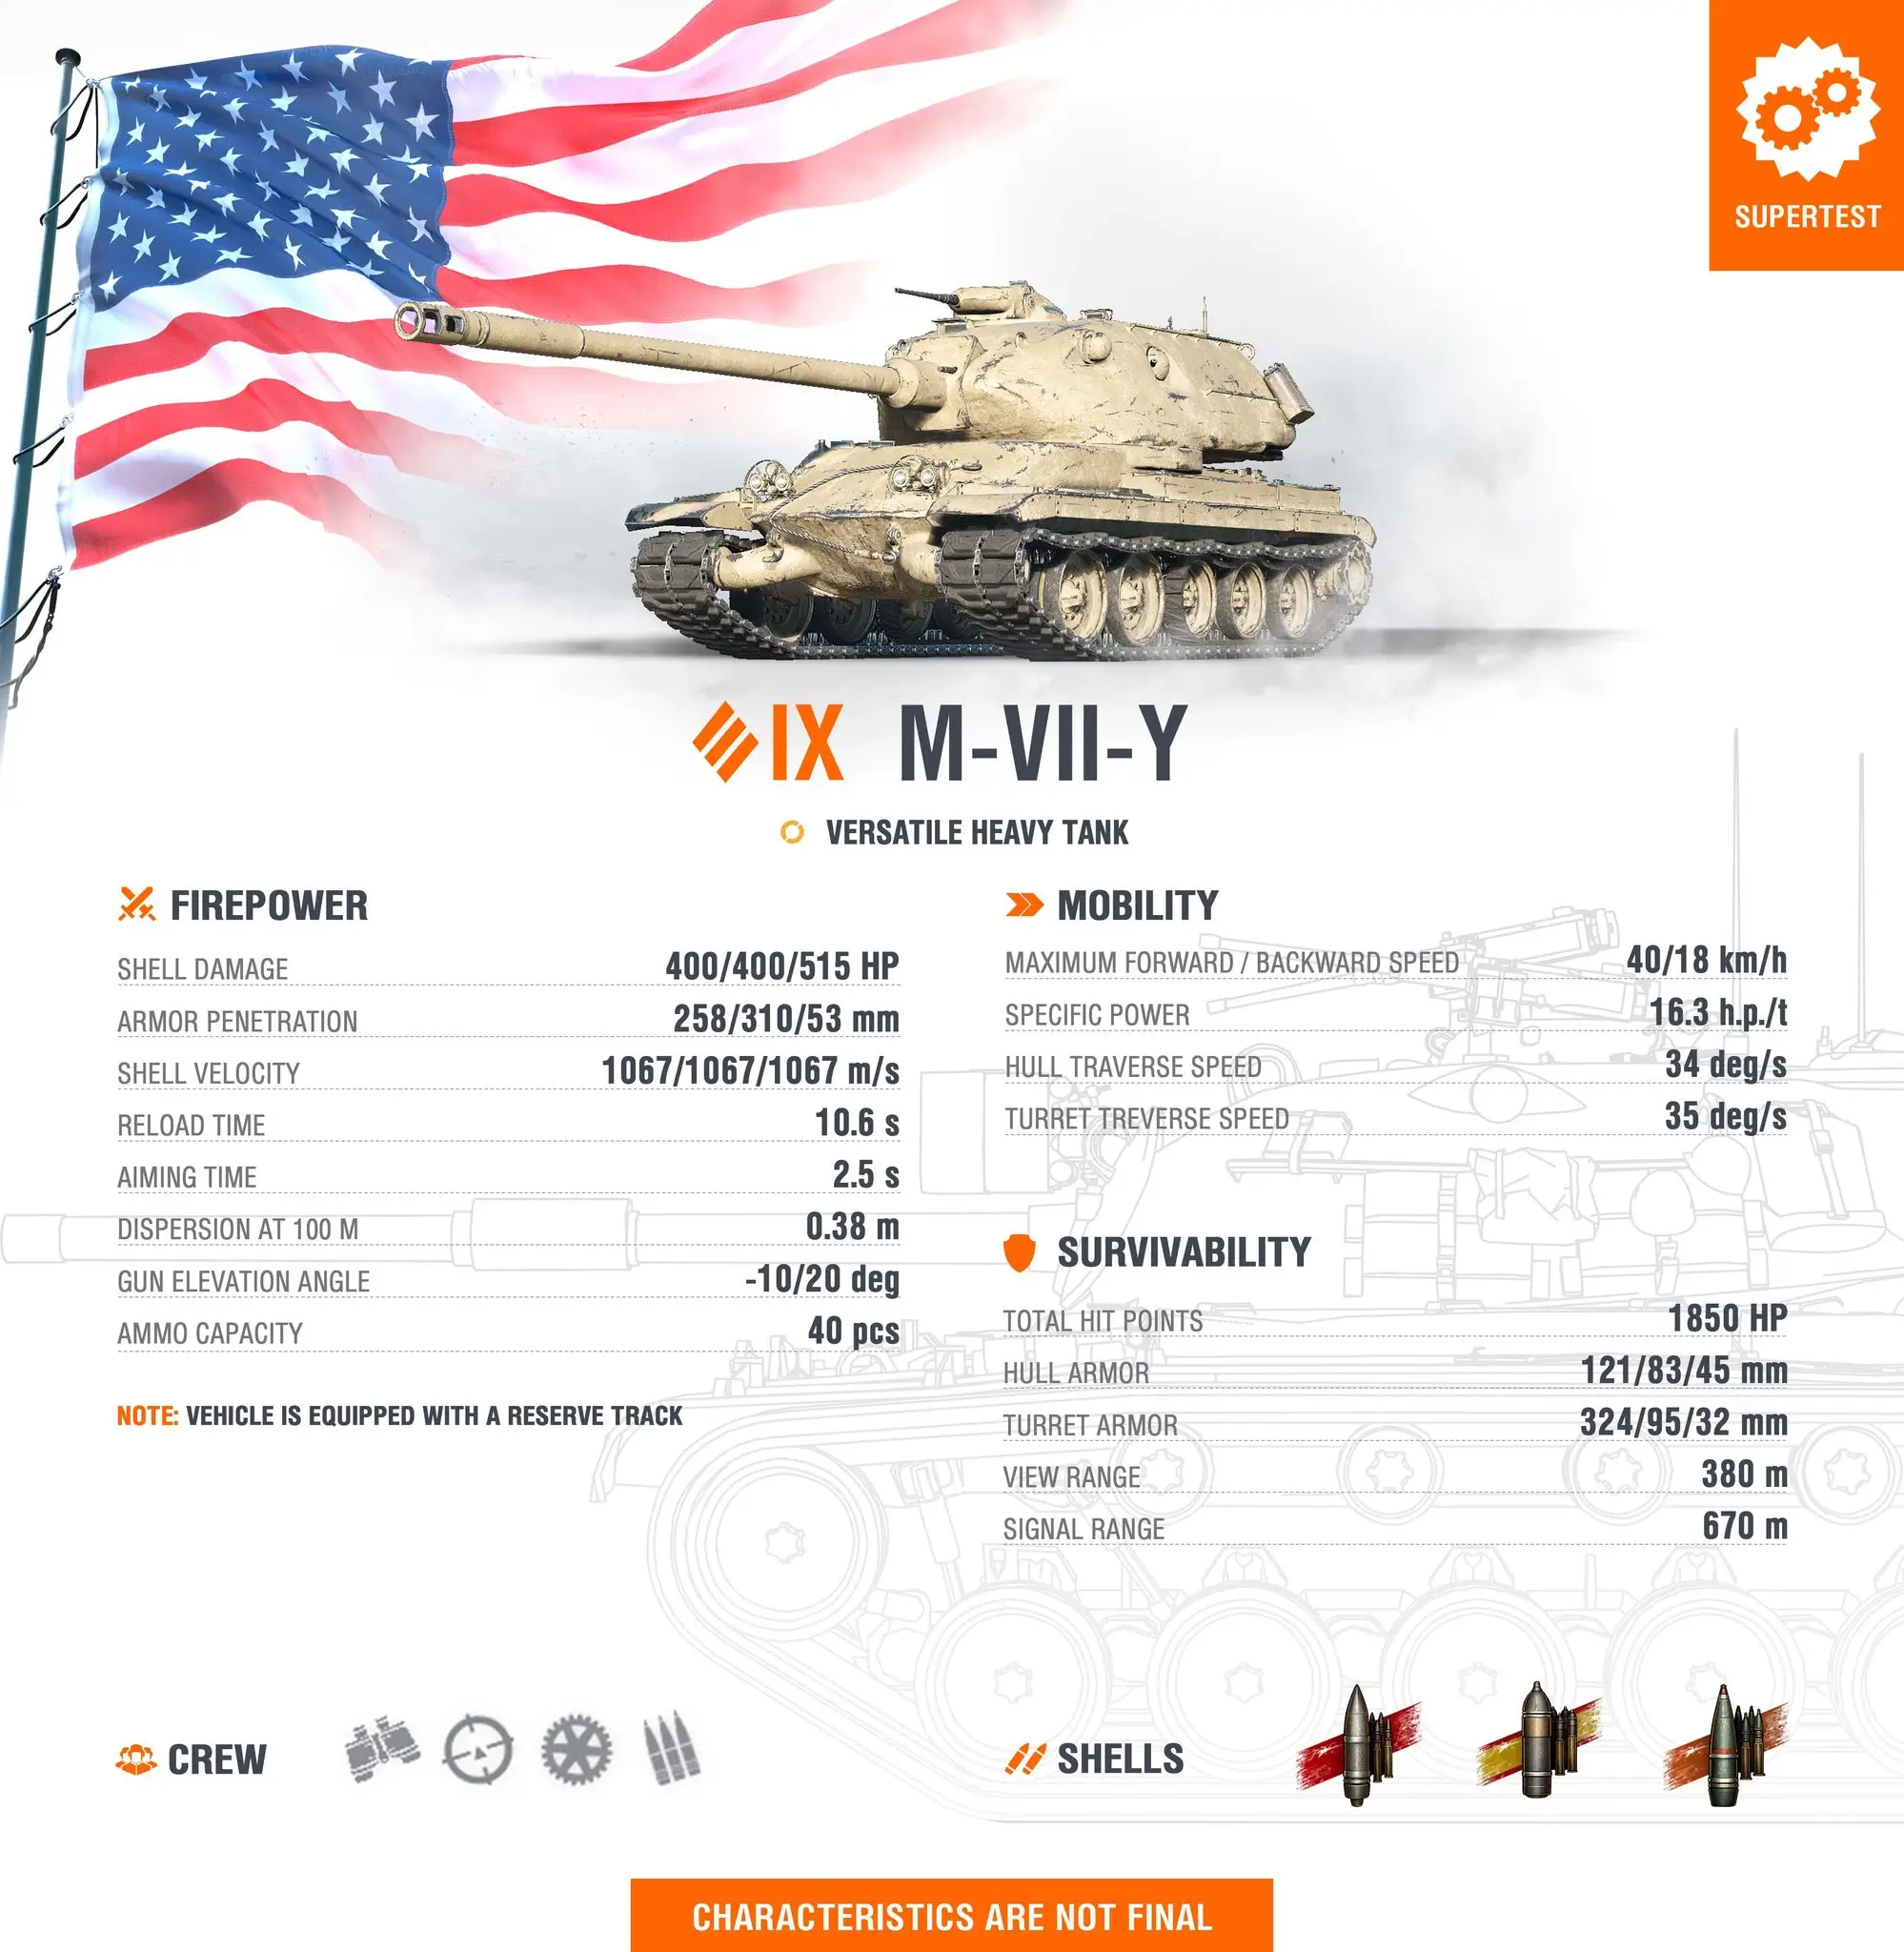
The World of Tanks Supertest has welcomed an intriguing addition to the French medium tank lineup: the M47 Chevalier, a Tier IX premium versatile medium tank based on the American M47 Patton extensively used and modified by the French military. For players who appreciate French flexibility but want something fundamentally different from the oscillating turret autoloaders or the wheeled light tanks, the M47 Chevalier offers a compelling package built around terrain exploitation, consistent firepower, and balanced performance across multiple combat situations.
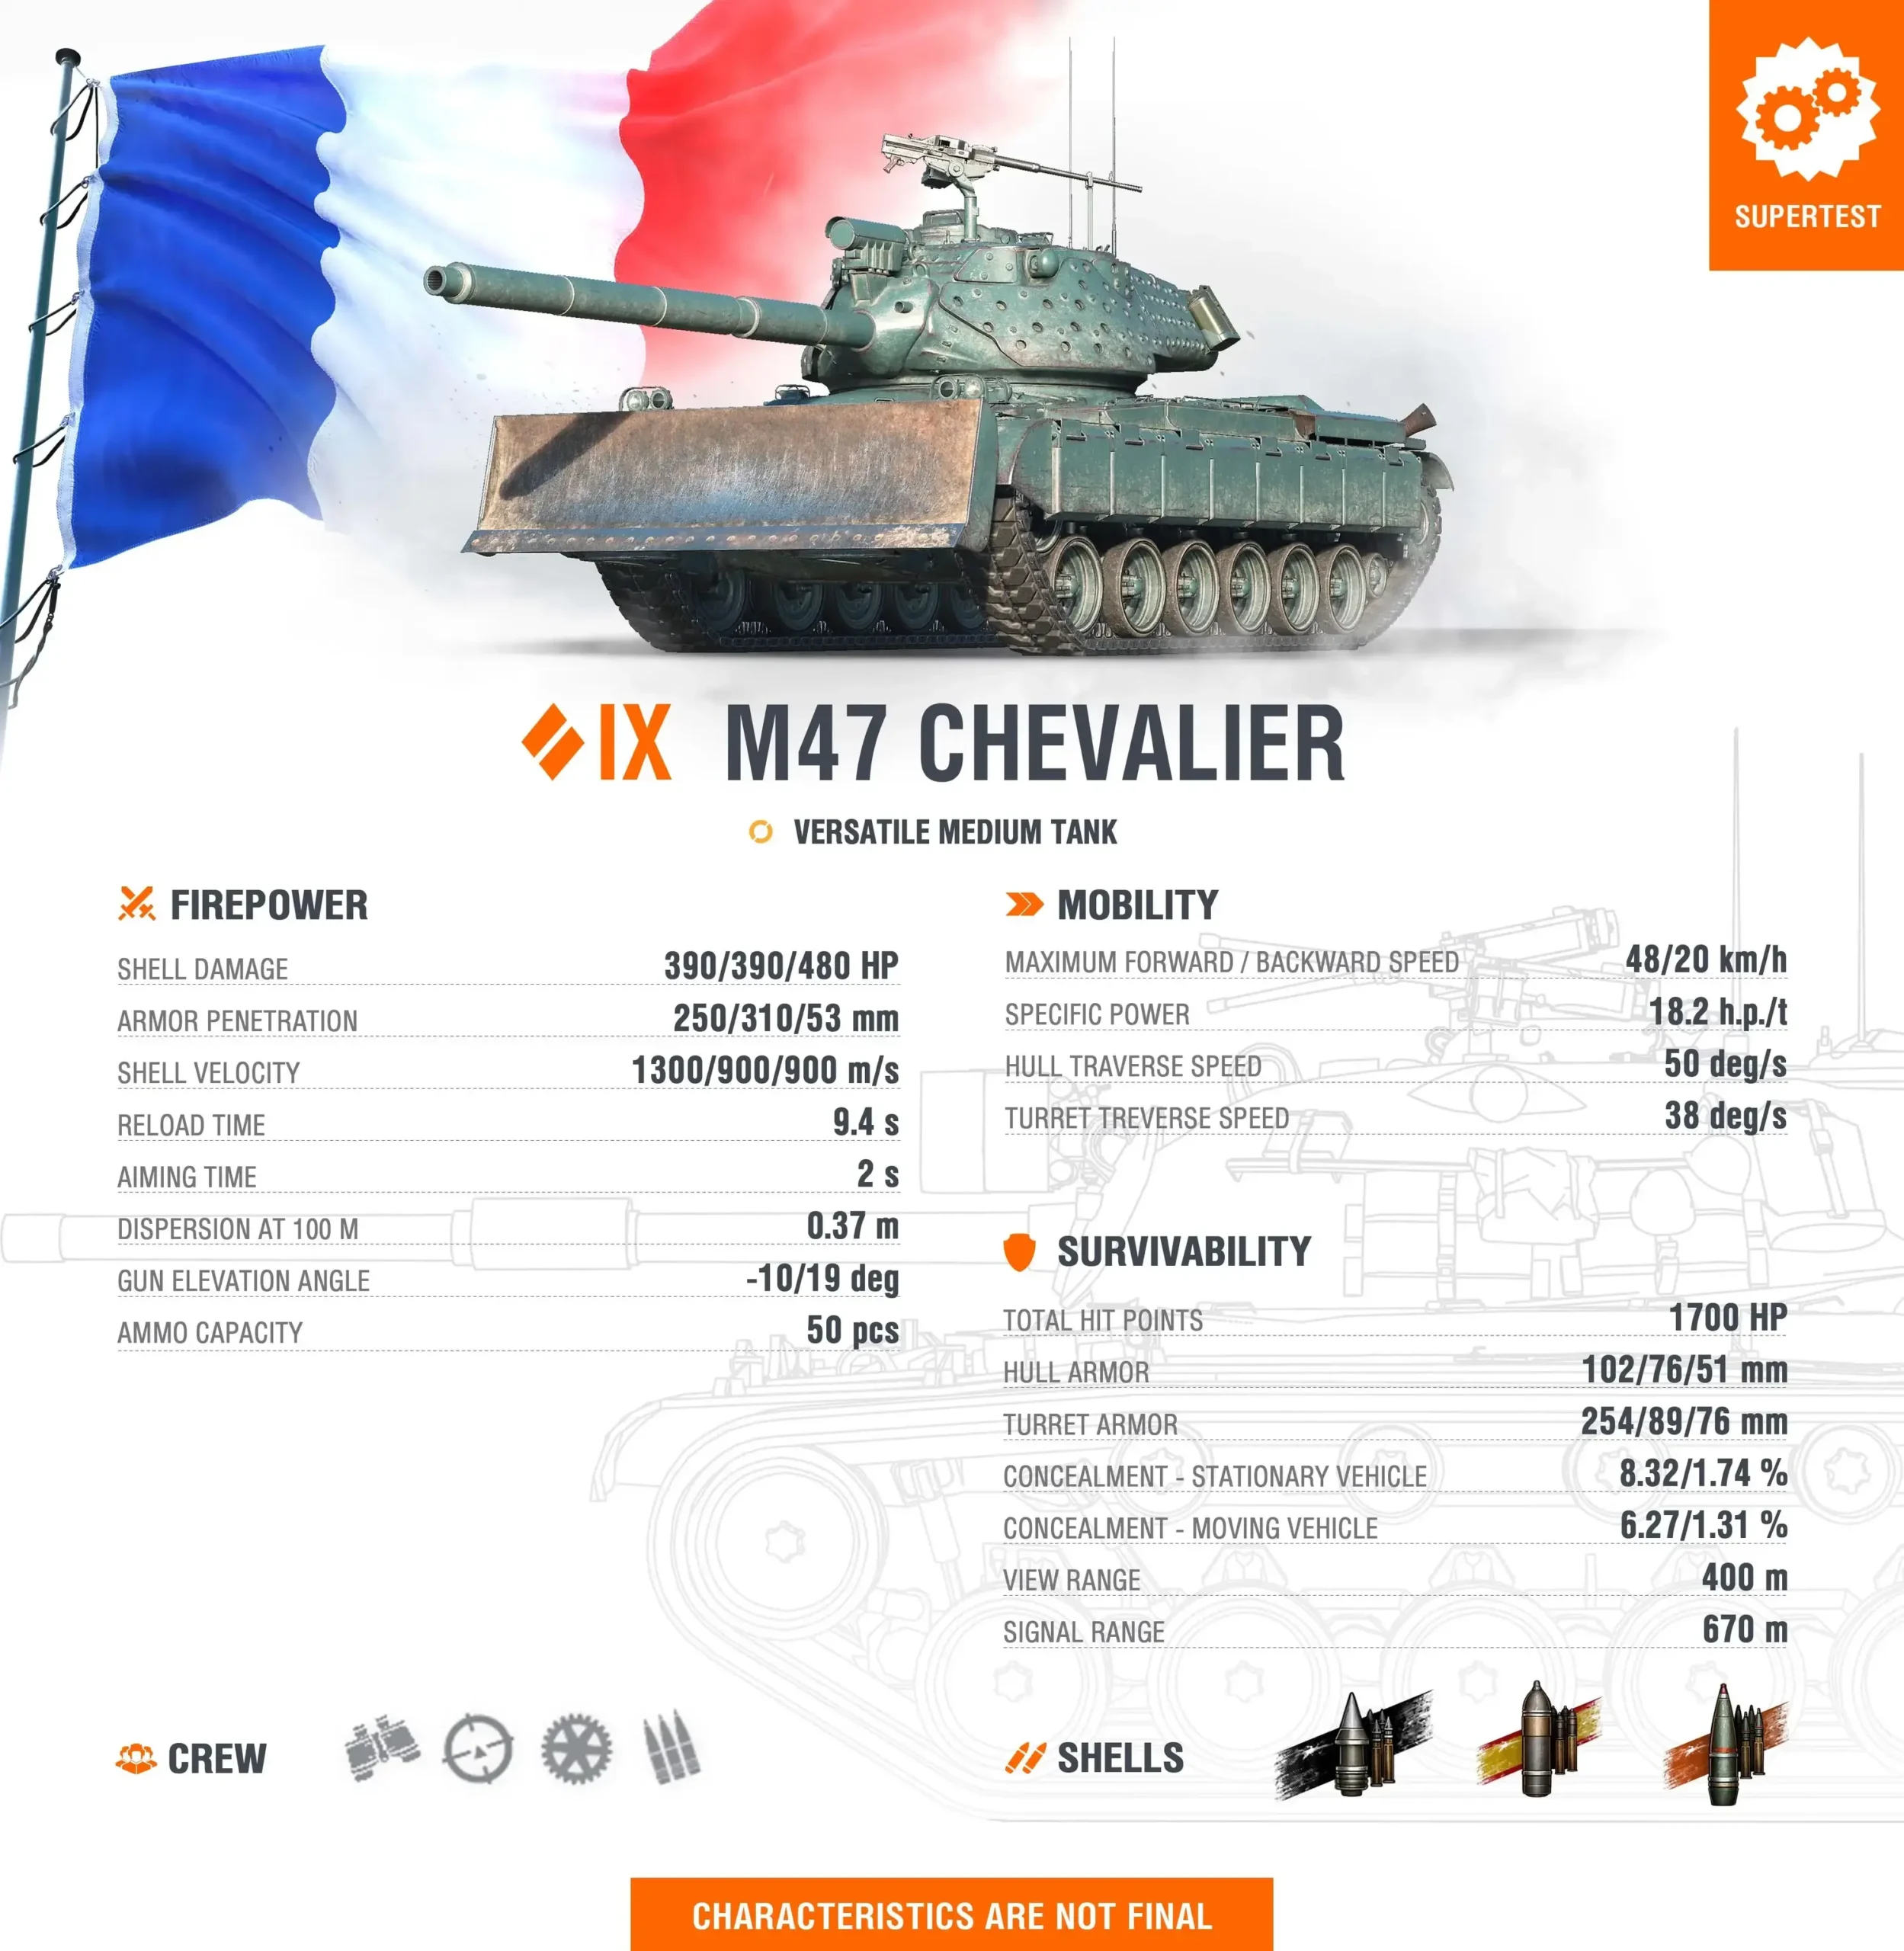
390 HP Alpha Damage: Reliable Impact
The M47 Chevalier delivers competitive per-shot damage for Tier IX:
390 HP Per Shot: The alpha damage is solid for a Tier IX medium tank, matching many contemporaries and creating meaningful trades in direct engagements. Each shot carries sufficient impact to matter without requiring extended clip commitments.
Consistent Damage Output: Unlike autoloaders that alternate between devastating clips and lengthy reloads, the M47 Chevalier maintains steady damage delivery throughout battles. The 390 HP alpha enables continuous pressure without vulnerability windows.
Medium Tank Parity: The damage matches standard Tier IX medium expectations, enabling the M47 Chevalier to trade favorably against same-class opponents while remaining competitive against heavies when properly positioned.
2,596 DPM: The damage-per-minute of 2,596 is respectable for Tier IX, creating sustainable damage output in extended engagements. The M47 Chevalier can contribute meaningful damage throughout battles without relying on burst mechanics.
Finishing Capability: The 390 HP alpha is well-positioned to finish wounded opponents who have taken moderate damage. Targets sitting between 400-800 HP can be eliminated in two well-placed shots, enabling efficient cleanup work.
250mm APCR Standard Penetration: Premium Performance
The M47 Chevalier brings exceptional standard ammunition:
250mm APCR Penetration: The standard ammunition features APCR rounds with 250mm of penetration—values that would be premium rounds on many vehicles. This penetration enables confident engagement against most Tier IX opponents without gold ammunition dependency.
APCR Standard Philosophy: Using APCR as standard ammunition provides high shell velocity, reducing lead time on moving targets and maintaining penetration better over distance compared to standard AP rounds. This characteristic supports accurate fire at medium-to-long ranges.
Economic Efficiency: The high standard penetration reduces reliance on expensive premium ammunition, improving credit earnings and enabling sustainable gameplay for commanders without premium accounts or extensive credit reserves.
Versatile Engagement Capability: The 250mm standard penetration opens frontal engagement options against many targets that would force AP-standard vehicles to load premium ammunition. The M47 Chevalier can participate confidently in direct combat without constant ammunition economics management.
Reliable Damage Delivery: High standard penetration combined with good accuracy (0.35 dispersion) creates consistent damage output. The frustration of bouncing shots off seemingly vulnerable targets is minimized, enabling focus on positioning and target selection.
Exceptional 10-Degree Gun Depression: Ridge-Line Mastery
The M47 Chevalier offers legendary gun depression:
10 Degrees of Gun Depression: The exceptional -10° gun depression is among the best at Tier IX and enables the M47 Chevalier to leverage terrain features that are completely inaccessible to vehicles with standard -5° to -6° depression. This capability fundamentally defines the vehicle’s tactical identity.
Ridge-Line Fighting Excellence: The combination of 10° depression and solid turret armor creates devastating ridge-line capability. The M47 Chevalier can crest hills, deliver accurate 390 HP shots, and retreat to safety while exposing only the well-protected turret.
Minimal Exposure Requirement: Deep gun depression enables firing from positions where only the turret is visible, dramatically reducing the target profile and protecting the hull from return fire. This characteristic multiplies survivability in hull-down positions.
Versatile Terrain Exploitation: The M47 Chevalier can fight effectively from slopes, hills, and uneven terrain that forces other medium tanks into suboptimal flat-ground engagements. This versatility provides significant tactical advantages across diverse map types.
American Heritage: The 10° gun depression continues the M47 Patton’s American design philosophy, bringing legendary terrain adaptation to the French tech tree and creating a medium tank that excels where geography creates firing opportunities.
Solid Turret Armor: Hull-Down Protection
The M47 Chevalier brings meaningful turret protection:
Solid Turret Armor: The turret armor is described as “solid,” suggesting reliable frontal protection that can bounce standard ammunition from many Tier IX opponents when properly positioned and potentially resist some premium rounds.
Hull-Down Synergy: The solid turret armor combined with 10° gun depression creates exceptional hull-down capability. When positioned on ridge lines with only the turret exposed, the M47 Chevalier becomes difficult to dislodge.
Face-Hardening Potential: While specific armor values have not been released, the “solid turret armor” designation suggests the M47 Chevalier can confidently engage in hull-down positions without immediate concern about turret penetrations.
Protection Philosophy: The armor design prioritizes the turret over the hull, creating a vehicle that survives through intelligent positioning and terrain exploitation rather than raw thickness across all surfaces.
Trading Confidence: The solid turret protection enables confident trading when hull-down, knowing that properly positioned, return fire will likely bounce while the M47 Chevalier delivers accurate 390 HP responses.
Spaced Armor: HEAT Protection
The M47 Chevalier features additional defensive characteristics:
Extensive Spaced Armor: The vehicle is equipped with “extensive spaced armor” that provides “additional protection from HEAT shells,” creating defensive advantages against premium ammunition that many opponents rely on at Tier IX.
HEAT Degradation: Spaced armor disrupts HEAT shell penetration mechanics, reducing their effectiveness and potentially causing bounces or reduced damage from shells that would penetrate conventional armor configurations.
Premium Ammunition Counter: At Tier IX, many opponents load premium HEAT rounds when facing medium tanks. The M47 Chevalier’s spaced armor directly counters this tendency, creating survivability advantages in matchups where enemies expect easy penetrations.
Survivability Enhancement: The additional HEAT protection improves overall durability, enabling the M47 Chevalier to sustain frontline presence longer than the base armor values might suggest.
Historical Authenticity: The spaced armor represents French experimentation with the M47 Patton platform, including modifications intended to improve protection against contemporary anti-tank weapons.
Good Mobility: Responsive Positioning
The M47 Chevalier offers competitive mobility for a medium tank:
48 km/h Maximum Forward Speed: The top speed is solid for Tier IX medium tanks, enabling the M47 Chevalier to keep pace with most contemporaries and respond to developing battlefield situations in a timely manner.
20 km/h Reverse Speed: The reverse speed is excellent and enables safe retreat from unfavorable positions. The M47 Chevalier can peek over ridge lines, fire, and reverse to safety quickly, supporting aggressive ridge-fighting gameplay.
Repositioning Flexibility: Good mobility supports the versatile medium tank role by enabling the M47 Chevalier to respond to changing battlefield conditions, relocate between ridge-line positions, and support different flanks as opportunities develop.
Early Position Securing: The mobility allows the M47 Chevalier to reach premium ridge-line positions early in battles, securing control over key terrain before slower opponents arrive and establishing dominance over critical areas.
Balanced Performance: The 48 km/h forward speed combined with 20 km/h reverse creates a mobility profile that supports both aggressive advances and tactical withdrawals, enabling flexible gameplay across diverse situations.
Versatile Medium Tank Classification: Flexible Combat
The M47 Chevalier’s design philosophy emphasizes adaptability:
No Single Specialization: The M47 Chevalier is explicitly described as having “no one area where it’s especially good, but it does well in a wide range of combat situations.” This versatility creates a vehicle that adapts to circumstances rather than forcing specific playstyles.
Wide Situational Effectiveness: The combination of good gun handling (1.92s aim time, 0.35 dispersion), 10° depression, solid turret armor, and good mobility creates a medium tank that performs competently across sniping, ridge-fighting, flanking, and support roles.
Comfortable Gun Characteristics: The weapon is described as “comfortable,” suggesting good overall gun handling that enables accurate fire without frustrating bloom penalties or excessive aim times.
Balanced Trade-Offs: Unlike specialized vehicles that excel dramatically in one area while suffering in others, the M47 Chevalier maintains balanced characteristics that prevent severe weaknesses from undermining overall effectiveness.
Adaptable Gameplay: The versatile classification enables commanders to read battlefield developments and position accordingly—sniping when terrain permits, ridge-fighting when opportunities exist, flanking when defenses weaken, or supporting when teammates need assistance.
Dozer Blade: Unique Equipment
The M47 Chevalier features distinctive visual and potentially functional equipment:
Dozer Blade Present: The vehicle is equipped with a dozer blade, creating a unique visual profile and potentially offering functional advantages related to terrain modification or additional frontal protection.
Historical Accuracy: The dozer blade represents authentic French modifications to the M47 Patton platform, where engineering equipment was occasionally mounted for field fortification and obstacle clearance operations.
Visual Distinction: The dozer blade creates immediate visual recognition, distinguishing the M47 Chevalier from standard M47 Patton variants and other French medium tanks in the lineup.
Frontal Protection Potential: While specifics have not been confirmed, dozer blades in World of Tanks occasionally provide additional armor or track protection, potentially enhancing survivability in frontal engagements.
French Experimentation: The blade exemplifies the French military’s experimental approach to the M47 Patton platform, testing various modifications to adapt the American design to French operational requirements.
Methodical Frontline Pressure
The M47 Chevalier’s design supports calculated, position-focused gameplay:
Ridge-Line Priority: Success requires identifying and controlling key ridge-line positions where the 10° gun depression creates maximum advantage. These positions transform the M47 Chevalier from competent to exceptional.
Versatile Engagement Selection: The balanced characteristics enable the M47 Chevalier to engage from multiple ranges and positions. Choose engagement types based on terrain availability and enemy composition rather than being locked into single approaches.
Hull-Down Discipline: When terrain permits hull-down positioning, leverage the solid turret armor and 10° depression to create nearly impenetrable firing positions while delivering consistent 390 HP damage.
Mobility Leverage: Use the good mobility and excellent reverse speed to rotate between multiple firing positions, relocate when spotted, and respond to battlefield developments rather than remaining static.
Consistent Contribution: The 2,596 DPM and reliable 250mm penetration enable steady damage output throughout battles. The M47 Chevalier contributes consistently rather than in devastating bursts followed by vulnerability windows.
Tactical Considerations
The M47 Chevalier’s characteristics create specific tactical opportunities:
Terrain Reading: Develop map knowledge focused on ridge-line positions and hull-down opportunities. Understanding where the M47 Chevalier excels versus where it struggles directly impacts battle performance.
Gun Depression Exploitation: Maximize the 10° depression advantage by seeking slopes, hills, and elevated positions where other medium tanks cannot operate effectively. This creates local superiority through positioning.
Turret Positioning: Master turret weak point concealment and positioning to maximize the solid armor’s effectiveness. Even well-protected turrets have vulnerabilities that skilled opponents will target.
Ammunition Economics: The 250mm standard APCR penetration enables credit-positive gameplay. Reserve premium ammunition for super-heavy opponents or critical situations requiring guaranteed penetration.
Reverse Speed Usage: The excellent 20 km/h reverse enables aggressive peek-and-shoot gameplay. Crest ridges, fire, and reverse to safety in smooth sequences that minimize exposure time.
Playstyle Implications
The M47 Chevalier rewards commanders who embrace flexible, terrain-focused gameplay:
Adaptability Over Specialization: Success requires reading battlefield conditions and adapting tactics. The M47 Chevalier performs across multiple roles but excels when commanders leverage the right capability for each situation.
Hull-Down When Possible: Prioritize hull-down positions when terrain permits. The combination of 10° depression and solid turret armor creates maximum effectiveness in these locations.
Consistent Contribution: Focus on steady damage delivery rather than dramatic plays. The M47 Chevalier wins through reliable 390 HP shots throughout battles, not single devastating moments.
Terrain Awareness: Constantly evaluate terrain for hull-down opportunities. The M47 Chevalier’s effectiveness varies dramatically based on whether ridge lines and elevation changes are available.
Commanders looking to master the M47 Chevalier should consider:
- Learning premium ridge-line positions on each map where 10° depression creates overwhelming advantages
- Practicing reverse-speed discipline to maximize hull-down peek-and-shoot efficiency
- Understanding when to prioritize sniping versus ridge-fighting versus flanking based on circumstances
- Using the 250mm standard penetration to maintain credit-positive gameplay
- Developing map reading skills to identify where the M47 Chevalier’s versatility matters most
- Mastering turret positioning to maximize solid armor effectiveness while concealing weak points
- Leveraging the good mobility to secure early positions and relocate based on developments
- Maintaining consistent damage output rather than forcing dramatic but risky plays
Community Reception
Initial community reactions to the M47 Chevalier reveal measured perspectives:
“Finally, a Normal French Medium”: Many players expressed appreciation for a French medium tank without oscillating turret mechanics, autoloaders, or wheeled configurations, viewing the M47 Chevalier as a refreshing return to conventional gameplay.
Versatility Skepticism: Community discussion immediately questioned whether “versatile” translates to “mediocre across the board” or genuinely effective in multiple roles, with concerns that specialized opponents might dominate in their preferred engagement types.
Depression Appreciation: The 10° gun depression generated universal praise, with commanders recognizing this characteristic as the M47 Chevalier’s most valuable asset and the feature that could elevate it beyond simple “average medium tank” status.
“Another Premium Medium”: Some community members expressed fatigue with premium medium tank releases, questioning whether Tier IX needs another versatile medium when tech tree options exist.
Historical Interest: The M47 Patton platform with French modifications generated interest from history-focused players who appreciate the real-world experimentation France conducted with American-supplied equipment during the Cold War era.
What Sets the M47 Chevalier Apart
The M47 Chevalier occupies a unique position in the Tier IX medium tank landscape:
American Depression in French Colors: The M47 Chevalier is the first French medium tank at Tier IX to offer legendary American-style 10° gun depression, opening tactical possibilities historically unavailable to the nation.
True Versatile Medium: Unlike vehicles that claim versatility but excel in only one area, the M47 Chevalier genuinely adapts across multiple roles—sniping with good gun handling, ridge-fighting with 10° depression, and supporting with consistent DPM.
APCR Standard Ammunition: The 250mm APCR standard penetration is exceptional for Tier IX medium tanks and reduces economic pressure compared to vehicles dependent on premium ammunition for reliable performance.
Spaced Armor HEAT Protection: The extensive spaced armor creates defensive advantages against premium HEAT shells that many opponents rely on, providing survivability beyond the base armor values.
Balanced Without Extremes: The M47 Chevalier avoids extreme specialization in any direction, creating a vehicle that performs competently across diverse situations without the severe weaknesses that plague highly specialized designs.
What’s Next?
As a Supertest vehicle, the M47 Chevalier’s characteristics remain subject to adjustment. Key questions for testing include:
- What are the exact turret armor values, and can they reliably bounce Tier IX standard ammunition?
- How effective is the spaced armor against HEAT shells in practical gameplay?
- Does the dozer blade provide functional benefits beyond visual distinction?
- Will this be a premium tank for direct purchase, or potentially a reward vehicle?
- Can the M47 Chevalier’s versatility compete against specialized opponents in their preferred domains?
- How will the M47 Chevalier differentiate itself from other versatile Tier IX mediums like the Centurion 7/1?
- Does the 390 HP alpha combined with 2,596 DPM create adequate damage output for competitive gameplay?
Final Thoughts
The M47 Chevalier represents a refreshing approach to French medium tank design. By bringing American-style 10° gun depression to a versatile platform with solid turret armor, good mobility, and excellent standard penetration, Wargaming has created a vehicle that rewards intelligent positioning and adaptive gameplay without forcing commanders into rigid playstyle commitments.
For commanders who appreciate terrain exploitation, enjoy flexible gameplay that adapts to battlefield conditions, and value consistent performance over extreme specialization, the M47 Chevalier offers appealing potential. The 10° gun depression creates positioning opportunities unavailable to most French mediums, while the balanced characteristics enable effectiveness across diverse combat situations.
However, the M47 Chevalier’s versatility is both its greatest strength and potential limitation. Vehicles that perform well across multiple areas sometimes lack the extreme effectiveness in specific domains that defines memorable tanks. Against highly specialized opponents—dedicated snipers at long range, autoloader burst damage at close quarters, or heavily armored brawlers in direct confrontations—the M47 Chevalier may find itself outmatched in head-to-head comparisons.
The “no one area where it’s especially good” description could prove prophetic. If the balanced characteristics create merely adequate performance across all situations rather than genuine excellence in adapted roles, the M47 Chevalier risks becoming forgettable despite its solid fundamentals. Success will depend on whether the 10° gun depression, solid turret armor, and versatile characteristics combine into a cohesive, effective package that rewards skilled play.
Whether you’re excited about a French medium with American-style gun depression and versatile characteristics or skeptical about whether balanced performance translates to competitive effectiveness, the M47 Chevalier undeniably offers something different for the French tech tree. If Wargaming successfully balances the armor profile, gun handling, and versatility elements, the M47 Chevalier could become a favorite for players who enjoy reading battlefields and adapting tactics rather than forcing single approaches.
For those who have wanted a French medium tank with legendary gun depression and flexible gameplay without oscillating turret or autoloader commitments, the M47 Chevalier might be exactly what you’ve been waiting for.
Characteristics Are Not Final — all information sourced from World of Tanks Supertest announcements.